Xerox 8560MFP User Guide - Page 34
Address, Properties, Protocols, TCP/IP, BOOTP/DHCP, Release Host Name, DDNS/WINS Name
 |
UPC - 095205428841
View all Xerox 8560MFP manuals
Add to My Manuals
Save this manual to your list of manuals |
Page 34 highlights
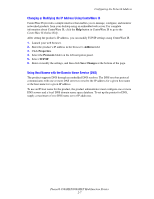
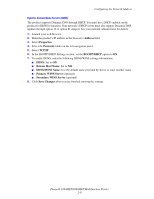
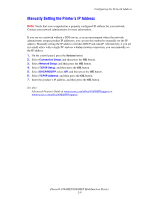
Configuring the Network Address Dynamic Domain Name Service (DDNS) The product supports Dynamic DNS through DHCP. You must have DHCP enabled on the product for DDNS to function. Your network's DHCP server must also support Dynamic DNS updates through option 12 or option 81 support. See your network administrator for details. 1. Launch your web browser. 2. Enter the product's IP address in the browser's Address field. 3. Select Properties. 4. Select the Protocols folder on the left navigation panel. 5. Select TCP/IP. 6. In the BOOTP/DHCP Settings section, set the BOOTP/DHCP option to ON. 7. To enable DDNS, enter the following DDNS/WINS settings information: ■ DDNS: Set to ON. ■ Release Host Name: Set to NO. ■ DDNS/WINS Name: Use the default name provided by Xerox or enter another name. ■ Primary WINS Server (optional) ■ Secondary WINS Server (optional) 8. Click Save Changes when you are finished entering the settings. Phaser® 8560MFP/8860MFP Multifunction Printer 2-8
-
 1
1 -
2
-
3
-
4
-
5
-
6
-
7
-
8
-
9
-
10
-
11
-
12
-
13
-
14
-
15
-
16
-
17
-
18
-
19
-
20
-
21
-
22
-
23
-
24
-
25
-
26
-
27
-
28
-
 29
29 -
 30
30 -
 31
31 -
 32
32 -
 33
33 -
 34
34 -
 35
35 -
 36
36 -
 37
37 -
 38
38 -
 39
39 -
40
-
41
-
42
-
43
-
44
-
45
-
46
-
47
-
48
-
49
-
50
-
51
-
52
-
53
-
54
-
55
-
56
-
57
-
58
-
59
-
60
-
61
-
62
-
63
-
64
-
65
-
66
-
67
-
68
-
69
-
70
-
71
-
72
-
73
-
74
-
75
-
76
-
77
-
78
-
79
-
80
-
81
-
82
-
83
-
84
-
85
-
86
-
87
-
88
-
89
-
90
-
91
-
92
-
93
-
94
-
95
-
96
-
97
-
98
-
99
-
100
-
101
-
102
-
103
-
104
-
105
-
106
-
107
-
108
-
109
-
110
-
111
-
112
-
113
-
114
-
115
-
116
-
117
-
118
-
119
-
120
-
121
-
122
-
123
-
124
-
125
-
126
-
127
-
128
-
129
-
130
-
131
-
132
-
133
-
134
-
135
-
136
-
137
-
138
-
139
-
140
-
141
-
142
-
143
-
144
-
145
-
146
-
147
-
148
-
149
-
150
-
151
-
152
-
153
-
154
-
155
-
156
-
157
-
158
-
159
-
160
-
161
-
162
-
163
-
164
-
165
-
166
-
167
-
168
-
169
-
170
-
171
-
172
-
173
-
174
-
175
-
176
-
177
-
178
-
179
-
180
-
181
-
182
-
183
-
184
-
185
-
186
-
187
-
188
-
189
-
190
-
191
-
192
-
193
-
194
-
195
-
196
-
197
-
198
-
199
-
200
-
201
-
202
-
203
-
204
-
205
-
206
-
207
-
208
-
209
-
210
-
211
-
212
-
213
-
214
-
215
-
216
-
217
-
218
-
219
-
220
-
221
-
222
-
223
-
224
-
225
-
226
-
227
-
228
-
229
-
230
-
231
-
232
-
233
-
234
-
235
-
236
-
237
-
238
-
239
-
240
-
241
-
242
-
243
-
244
-
245
-
246
-
247
-
248
-
249
-
250
-
251
-
252
-
253
-
254
-
255
-
256
-
257
-
258
-
259
-
260
-
261
-
262
-
263
-
264
-
265
-
266
-
267
-
268
-
269
-
270
-
271
-
272
-
273
-
274
-
275
-
276
-
277
-
278
-
279
-
280
-
281
 |
 |