Xerox 8560MFP User Guide - Page 77
flap side up, Envelope, Tray 1, Change setup
 |
UPC - 095205428841
View all Xerox 8560MFP manuals
Add to My Manuals
Save this manual to your list of manuals |
Page 77 highlights
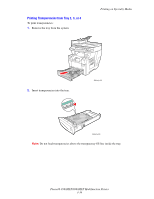
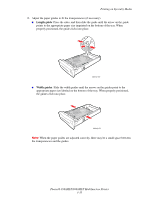
Printing on Specialty Media 3. Insert envelopes into the tray with the flap side up and the flap of the envelopes toward the left side of the tray. Adjust the paper guides to fit the envelopes. 8860mfp-019 4. On the control panel, press the OK button if the correct envelope size and type are displayed as the current setup, or select the envelope size and type: a. Select Change setup, and then press the OK button. b. Select the appropriate envelope size, and then press the OK button. c. Select Envelope, and then press the OK button. 5. In the printer driver, select either Envelope as the paper type or Tray 1 as the paper source. Phaser® 8560MFP/8860MFP Multifunction Printer 3-39
-
 1
1 -
2
-
3
-
4
-
5
-
6
-
7
-
8
-
9
-
10
-
11
-
12
-
13
-
14
-
15
-
16
-
17
-
18
-
19
-
20
-
21
-
22
-
23
-
24
-
25
-
26
-
27
-
28
-
29
-
30
-
31
-
32
-
33
-
34
-
35
-
36
-
37
-
38
-
39
-
40
-
41
-
42
-
43
-
44
-
45
-
46
-
47
-
48
-
49
-
50
-
51
-
52
-
53
-
54
-
55
-
56
-
57
-
58
-
59
-
60
-
61
-
62
-
63
-
64
-
65
-
66
-
67
-
68
-
69
-
70
-
71
-
 72
72 -
 73
73 -
 74
74 -
 75
75 -
 76
76 -
 77
77 -
 78
78 -
 79
79 -
 80
80 -
 81
81 -
 82
82 -
83
-
84
-
85
-
86
-
87
-
88
-
89
-
90
-
91
-
92
-
93
-
94
-
95
-
96
-
97
-
98
-
99
-
100
-
101
-
102
-
103
-
104
-
105
-
106
-
107
-
108
-
109
-
110
-
111
-
112
-
113
-
114
-
115
-
116
-
117
-
118
-
119
-
120
-
121
-
122
-
123
-
124
-
125
-
126
-
127
-
128
-
129
-
130
-
131
-
132
-
133
-
134
-
135
-
136
-
137
-
138
-
139
-
140
-
141
-
142
-
143
-
144
-
145
-
146
-
147
-
148
-
149
-
150
-
151
-
152
-
153
-
154
-
155
-
156
-
157
-
158
-
159
-
160
-
161
-
162
-
163
-
164
-
165
-
166
-
167
-
168
-
169
-
170
-
171
-
172
-
173
-
174
-
175
-
176
-
177
-
178
-
179
-
180
-
181
-
182
-
183
-
184
-
185
-
186
-
187
-
188
-
189
-
190
-
191
-
192
-
193
-
194
-
195
-
196
-
197
-
198
-
199
-
200
-
201
-
202
-
203
-
204
-
205
-
206
-
207
-
208
-
209
-
210
-
211
-
212
-
213
-
214
-
215
-
216
-
217
-
218
-
219
-
220
-
221
-
222
-
223
-
224
-
225
-
226
-
227
-
228
-
229
-
230
-
231
-
232
-
233
-
234
-
235
-
236
-
237
-
238
-
239
-
240
-
241
-
242
-
243
-
244
-
245
-
246
-
247
-
248
-
249
-
250
-
251
-
252
-
253
-
254
-
255
-
256
-
257
-
258
-
259
-
260
-
261
-
262
-
263
-
264
-
265
-
266
-
267
-
268
-
269
-
270
-
271
-
272
-
273
-
274
-
275
-
276
-
277
-
278
-
279
-
280
-
281
 |
 |

Printing on Specialty Media
Phaser® 8560MFP/8860MFP Multifunction Printer
3-39
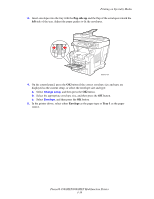
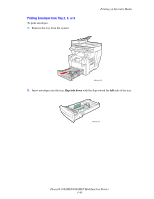
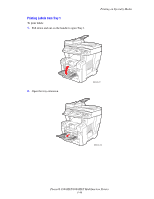
3.
Insert envelopes into the tray with the
flap side up
and the flap of the envelopes toward the
left
side of the tray. Adjust the paper guides to fit the envelopes.
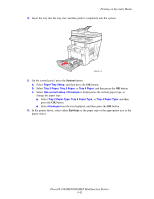
4.
On the control panel, press the
OK
button if the correct envelope size and type are
displayed as the current setup, or select the envelope size and type:
a.
Select
Change setup
, and then press the
OK
button.
b.
Select the appropriate envelope size, and then press the
OK
button.
c.
Select
Envelope
, and then press the
OK
button.
5.
In the printer driver, select either
Envelope
as the paper type or
Tray 1
as the paper
source.
8860mfp-019