Yamaha CVP-405 Owner's Manual - Page 143
Step Recording, Basic Operations for Step Recording
 |
View all Yamaha CVP-405 manuals
Add to My Manuals
Save this manual to your list of manuals |
Page 143 highlights
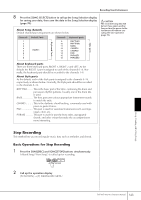
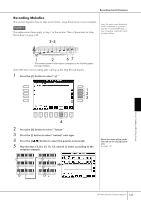
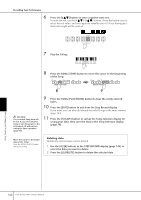
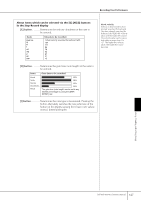
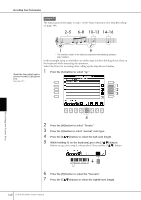
Recording Your Performance 8 Press the [SONG SELECT] button to call up the Song Selection display for saving your data, then save the data in the Song Selection display (page 70). Style parts Keyboard Parts About Song channels Default channel/part assignments are shown below. Channels 1 2 3 4 5 6 7 8 Default Parts RIGHT1 Channels 9 10 11 12 13 14 15 16 Keyboard parts RHYTHM1 RHYTHM2 BASS CHORD1 CHORD2 PAD PHRASE1 PHRASE2 CAUTION The recorded Song data will be lost if you select another Song or turn the power to the instrument off without executing the Save operation (page 70). About keyboard parts There are three keyboard parts, RIGHT 1, RIGHT 2 and LEFT. As the default, the RIGHT 1 part is assigned to each of the channels 1-8. Normally, the keyboard parts should be recorded to the channels 1-8. About Style parts As the default, each of the Style parts is assigned to the channels 9-16, respectively as shown below. Normally, the Style parts should be recorded to the channels 9-16. RHYTHM ......... This is the basic part of the Style, containing the drum and percussion rhythm patterns. Usually one of the drum kits is used. BASS The bass part uses various appropriate instrument sounds to match the style. CHORD This is the rhythmic chord backing, commonly used with piano or guitar Voices. PAD This part is used for sustained instruments such as strings, organ, choir, etc. PHRASE This part is used for punchy brass stabs, arpeggiated chords, and other extras that make the accompaniment more interesting. Step Recording This method lets you record regular music data such as melodies and chords. Basic Operations for Step Recording 1 Press the SONG[REC] and SONG[STOP] buttons simultaneously. A blank Song ("New Song") is called up for recording. 2 Call up the operation display. [FUNCTION] → [F] DIGITAL REC MENU Using, Creating and Editing Songs CVP-405/403/401 Owner's Manual 143
-
 1
1 -
2
-
3
-
4
-
5
-
6
-
7
-
8
-
9
-
10
-
11
-
12
-
13
-
14
-
15
-
16
-
17
-
18
-
19
-
20
-
21
-
22
-
23
-
24
-
25
-
26
-
27
-
28
-
29
-
30
-
31
-
32
-
33
-
34
-
35
-
36
-
37
-
38
-
39
-
40
-
41
-
42
-
43
-
44
-
45
-
46
-
47
-
48
-
49
-
50
-
51
-
52
-
53
-
54
-
55
-
56
-
57
-
58
-
59
-
60
-
61
-
62
-
63
-
64
-
65
-
66
-
67
-
68
-
69
-
70
-
71
-
72
-
73
-
74
-
75
-
76
-
77
-
78
-
79
-
80
-
81
-
82
-
83
-
84
-
85
-
86
-
87
-
88
-
89
-
90
-
91
-
92
-
93
-
94
-
95
-
96
-
97
-
98
-
99
-
100
-
101
-
102
-
103
-
104
-
105
-
106
-
107
-
108
-
109
-
110
-
111
-
112
-
113
-
114
-
115
-
116
-
117
-
118
-
119
-
120
-
121
-
122
-
123
-
124
-
125
-
126
-
127
-
128
-
129
-
130
-
131
-
132
-
133
-
134
-
135
-
136
-
137
-
 138
138 -
 139
139 -
 140
140 -
 141
141 -
 142
142 -
 143
143 -
 144
144 -
 145
145 -
 146
146 -
 147
147 -
 148
148 -
149
-
150
-
151
-
152
-
153
-
154
-
155
-
156
-
157
-
158
-
159
-
160
-
161
-
162
-
163
-
164
-
165
-
166
-
167
-
168
-
169
-
170
-
171
-
172
-
173
-
174
-
175
-
176
-
177
-
178
-
179
-
180
-
181
-
182
-
183
-
184
-
185
-
186
-
187
-
188
-
189
-
190
-
191
-
192
-
193
-
194
-
195
-
196
-
197
-
198
-
199
-
200
-
201
-
202
-
203
-
204
-
205
-
206
-
207
-
208
-
209
-
210
-
211
-
212
-
213
-
214
-
215
-
216
-
217
-
218
-
219
-
220
-
221
-
222
-
223
-
224
-
225
-
226
 |
 |