Yamaha CVP-405 Owner's Manual - Page 212
Installing the Floppy Disk Drive (Optional) (CVP-405
 |
View all Yamaha CVP-405 manuals
Add to My Manuals
Save this manual to your list of manuals |
Page 212 highlights
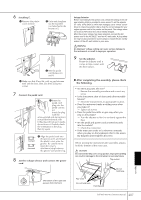
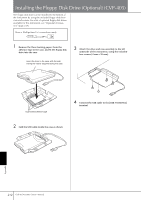
Installing the Floppy Disk Drive (Optional) (CVP-405) The floppy disk drive can be installed to the bottom of the instrument by using the included floppy disk drive case and screws. For a list of optional floppy disk drives available for this instrument, see "Optional Accessories" (page 214). Have a Phillips-head (+) screwdriver ready. 1 Remove the three backing papers from the adhesive tape in the case, and fit the floppy disk drive into the case. Insert the drive to the case, with the side having the rubber stoppers facing the case. 3 Attach the drive and case assembly to the left underside of the instrument, using the included four screws (4 mm x 10 mm). Dual-sided adhesive tape 4 Connect the USB cable to the [USB TO DEVICE] terminal. 2 Fold the USB cable inside the case as shown. Appendix 212 CVP-405/403/401 Owner's Manual
-
 1
1 -
2
-
3
-
4
-
5
-
6
-
7
-
8
-
9
-
10
-
11
-
12
-
13
-
14
-
15
-
16
-
17
-
18
-
19
-
20
-
21
-
22
-
23
-
24
-
25
-
26
-
27
-
28
-
29
-
30
-
31
-
32
-
33
-
34
-
35
-
36
-
37
-
38
-
39
-
40
-
41
-
42
-
43
-
44
-
45
-
46
-
47
-
48
-
49
-
50
-
51
-
52
-
53
-
54
-
55
-
56
-
57
-
58
-
59
-
60
-
61
-
62
-
63
-
64
-
65
-
66
-
67
-
68
-
69
-
70
-
71
-
72
-
73
-
74
-
75
-
76
-
77
-
78
-
79
-
80
-
81
-
82
-
83
-
84
-
85
-
86
-
87
-
88
-
89
-
90
-
91
-
92
-
93
-
94
-
95
-
96
-
97
-
98
-
99
-
100
-
101
-
102
-
103
-
104
-
105
-
106
-
107
-
108
-
109
-
110
-
111
-
112
-
113
-
114
-
115
-
116
-
117
-
118
-
119
-
120
-
121
-
122
-
123
-
124
-
125
-
126
-
127
-
128
-
129
-
130
-
131
-
132
-
133
-
134
-
135
-
136
-
137
-
138
-
139
-
140
-
141
-
142
-
143
-
144
-
145
-
146
-
147
-
148
-
149
-
150
-
151
-
152
-
153
-
154
-
155
-
156
-
157
-
158
-
159
-
160
-
161
-
162
-
163
-
164
-
165
-
166
-
167
-
168
-
169
-
170
-
171
-
172
-
173
-
174
-
175
-
176
-
177
-
178
-
179
-
180
-
181
-
182
-
183
-
184
-
185
-
186
-
187
-
188
-
189
-
190
-
191
-
192
-
193
-
194
-
195
-
196
-
197
-
198
-
199
-
200
-
201
-
202
-
203
-
204
-
205
-
206
-
 207
207 -
 208
208 -
 209
209 -
 210
210 -
 211
211 -
 212
212 -
 213
213 -
 214
214 -
 215
215 -
 216
216 -
 217
217 -
218
-
219
-
220
-
221
-
222
-
223
-
224
-
225
-
226
 |
 |
