2009 Kawasaki JET SKI Ultra 260X Owners Manual - Page 113
2009 Kawasaki JET SKI Ultra 260X Manual

Page 113 highlights
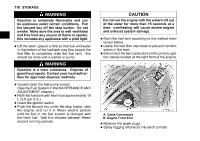
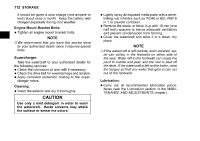
STORAGE 111 the engine over several times with the start • Turn button to coat the cylinder walls. WARNING Do not lean over the engine when performing this procedure. An air/oil mist may be forcibly ejected from the spark plug holes and could get into your eyes. If you do get some in your eyes, wash your eyes immediately with liberal amounts of clean, fresh water. Consult a physician as soon as possible. the spark plugs with fogging oil, and reinstall • Spray them. Spark Plugs Tightening Torque: 11 ∼ 15 N·m (1.1 ∼ 1.5 kgf·m, 8.1 ∼ 11 ft·lb) the lanyard key off the stop button and the • Pull ignition switch key. the spark plug caps. • Reinstall Connect the primary ignition cable connectors. • j A. Cable Connector (from No.1 & 4 spark plugs) B. Do. (from No.2 & 3 spark plugs) C. I.D. Tags (cables from ECU) NOTE żBe sure to make correct connections. Battery: Remove the battery (see the battery section in the MAINTENANCE AND ADJUSTMENTS chapter). Clean the exterior with a solution of baking soda and water (one heaping tablespoon of baking soda in one cup of water). Rinse thoroughly with water. • • Reconnect the cable connectors from No.1 & 4 spark plugs with the cables marked and tagged 1 & 4, and connectors from No. 2 & 3 spark plugs with the cables marked 2 & 3. Make sure the connector numbering by tracking the cables from the spark plugs. żBefore reconnecting, apply a high quality waterproof marine grease to the connectors. CAUTION Never remove the sealed cap, or the battery can be damaged. both battery terminals with grease. • Coat Store battery in a cool, dry place. Do not ex• pose itthe to freezing temperatures. During storage
-
 1
1 -
2
-
3
-
4
-
5
-
6
-
7
-
8
-
9
-
10
-
11
-
12
-
13
-
14
-
15
-
16
-
17
-
18
-
19
-
20
-
21
-
22
-
23
-
24
-
25
-
26
-
27
-
28
-
29
-
30
-
31
-
32
-
33
-
34
-
35
-
36
-
37
-
38
-
39
-
40
-
41
-
42
-
43
-
44
-
45
-
46
-
47
-
48
-
49
-
50
-
51
-
52
-
53
-
54
-
55
-
56
-
57
-
58
-
59
-
60
-
61
-
62
-
63
-
64
-
65
-
66
-
67
-
68
-
69
-
70
-
71
-
72
-
73
-
74
-
75
-
76
-
77
-
78
-
79
-
80
-
81
-
82
-
83
-
84
-
85
-
86
-
87
-
88
-
89
-
90
-
91
-
92
-
93
-
94
-
95
-
96
-
97
-
98
-
99
-
100
-
101
-
102
-
103
-
104
-
105
-
106
-
107
-
 108
108 -
 109
109 -
 110
110 -
 111
111 -
 112
112 -
 113
113 -
 114
114 -
 115
115 -
 116
116 -
 117
117 -
 118
118 -
119
-
120
-
121
-
122
-
123
-
124
-
125
-
126
-
127
-
128
-
129
-
130
-
131
-
132
-
133
-
134
-
135
-
136
-
137
-
138
-
139
-
140
-
141
-
142
-
143
-
144
-
145
-
146
-
147
-
148
-
149
-
150
-
151
-
152
-
153
-
154
-
155
-
156
-
157
-
158
 |
 |
