2009 Kawasaki JET SKI Ultra 260X Owners Manual - Page 84
2009 Kawasaki JET SKI Ultra 260X Manual

Page 84 highlights
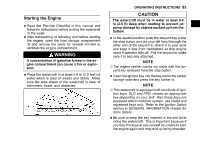
82 OPERATING INSTRUCTIONS Ƒ FUEL PRESSURE - Loosen the fuel tank cap to relieve any pressure, then tighten the cap securely. Ƒ FUEL LEVEL - Check the fuel level. Refill if necessary. Ƒ ENGINE OIL LEVEL - Check the oil level in the engine. Refill if necessary. Refer to GENERAL INFORMATION CHAPTER, Engine Oil section. Ƒ FUEL LEAKS - Check the engine compartment for fuel leaks. Ƒ OIL LEAKS - Check the engine compartment for oil leaks. Ƒ FASTENERS - Check and tighten any loose bolts, nuts, or clamps. Ƒ HOSE CONNECTIONS - Be sure all hose connections are secure and that all hose clamps are tight. Check all hoses for cracks or deterioration and replace if necessary. Ƒ DRAIN BILGE - Drain any water out of the engine compartment by removing the drain screws. Install the drain screws securely when all the water has been drained. Ƒ ENGINE SHUT-OFF LANYARD KEY-Start the engine and run it for a few seconds (see the Starting the Engine section). Pull the lanyard key off the engine stop button to check that the engine stops immediately. Ƒ AIR BOX DRAIN CAP - Check for water and discharge it if there is any. WARNING Do not run the engine in a closed area. Exhaust gases contain carbon monoxide: a colorless, odorless, poisonous gas. Breathing exhaust gas leads to carbon monoxide poisoning, asphyxiation, and death. j CAUTION Do not run the engine with the watercraft out of the water for more than 15 seconds at a time. Overheating will cause engine and exhaust system damage. Ƒ STOP BUTTON- Again start the engine, run it for a few seconds, and then check that the engine "STOP" button works. Ƒ SEATS- Check that the seat latches are secure. Ƒ STORAGE COMPARTMENT- Check that the lid is secure. Ƒ RIDER PROTECTION- Always wear the proper flotation device and protective gear. Ƒ MULTIFUNCTION METER- Check the operation of the multifunction meter. See GENERAL INFORMATION chapter for the detail.
-
 1
1 -
2
-
3
-
4
-
5
-
6
-
7
-
8
-
9
-
10
-
11
-
12
-
13
-
14
-
15
-
16
-
17
-
18
-
19
-
20
-
21
-
22
-
23
-
24
-
25
-
26
-
27
-
28
-
29
-
30
-
31
-
32
-
33
-
34
-
35
-
36
-
37
-
38
-
39
-
40
-
41
-
42
-
43
-
44
-
45
-
46
-
47
-
48
-
49
-
50
-
51
-
52
-
53
-
54
-
55
-
56
-
57
-
58
-
59
-
60
-
61
-
62
-
63
-
64
-
65
-
66
-
67
-
68
-
69
-
70
-
71
-
72
-
73
-
74
-
75
-
76
-
77
-
78
-
 79
79 -
 80
80 -
 81
81 -
 82
82 -
 83
83 -
 84
84 -
 85
85 -
 86
86 -
 87
87 -
 88
88 -
 89
89 -
90
-
91
-
92
-
93
-
94
-
95
-
96
-
97
-
98
-
99
-
100
-
101
-
102
-
103
-
104
-
105
-
106
-
107
-
108
-
109
-
110
-
111
-
112
-
113
-
114
-
115
-
116
-
117
-
118
-
119
-
120
-
121
-
122
-
123
-
124
-
125
-
126
-
127
-
128
-
129
-
130
-
131
-
132
-
133
-
134
-
135
-
136
-
137
-
138
-
139
-
140
-
141
-
142
-
143
-
144
-
145
-
146
-
147
-
148
-
149
-
150
-
151
-
152
-
153
-
154
-
155
-
156
-
157
-
158
 |
 |
