2011 Kawasaki Concours 14 ABS Owners Manual - Page 212
2011 Kawasaki Concours 14 ABS Manual

Page 212 highlights
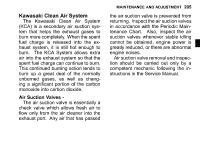
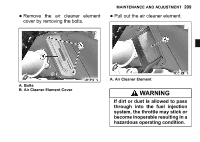
210 MAINTENANCE AND ADJUSTMENT NOTICE If dirt gets through into the engine, excessive engine wear and possibly engine damage will occur. Air Cleaner Element Installation Element and the removed parts installation is performed in the reverse order of removal, and make sure that the lead does not pinch with any parts. the air cleaner element cover • Install so that arrow mark faces upward. A. Arrow Mark B. Air Cleaner Element Cover the tabs on the lower part of the • Insert rear middle fairing, and then insert the tab on the upper part of the rear middle fairing, and attach the projection. Make sure the front end of the rear middle fairing is inserted into the hook of the front middle fairing.
-
 1
1 -
2
-
3
-
4
-
5
-
6
-
7
-
8
-
9
-
10
-
11
-
12
-
13
-
14
-
15
-
16
-
17
-
18
-
19
-
20
-
21
-
22
-
23
-
24
-
25
-
26
-
27
-
28
-
29
-
30
-
31
-
32
-
33
-
34
-
35
-
36
-
37
-
38
-
39
-
40
-
41
-
42
-
43
-
44
-
45
-
46
-
47
-
48
-
49
-
50
-
51
-
52
-
53
-
54
-
55
-
56
-
57
-
58
-
59
-
60
-
61
-
62
-
63
-
64
-
65
-
66
-
67
-
68
-
69
-
70
-
71
-
72
-
73
-
74
-
75
-
76
-
77
-
78
-
79
-
80
-
81
-
82
-
83
-
84
-
85
-
86
-
87
-
88
-
89
-
90
-
91
-
92
-
93
-
94
-
95
-
96
-
97
-
98
-
99
-
100
-
101
-
102
-
103
-
104
-
105
-
106
-
107
-
108
-
109
-
110
-
111
-
112
-
113
-
114
-
115
-
116
-
117
-
118
-
119
-
120
-
121
-
122
-
123
-
124
-
125
-
126
-
127
-
128
-
129
-
130
-
131
-
132
-
133
-
134
-
135
-
136
-
137
-
138
-
139
-
140
-
141
-
142
-
143
-
144
-
145
-
146
-
147
-
148
-
149
-
150
-
151
-
152
-
153
-
154
-
155
-
156
-
157
-
158
-
159
-
160
-
161
-
162
-
163
-
164
-
165
-
166
-
167
-
168
-
169
-
170
-
171
-
172
-
173
-
174
-
175
-
176
-
177
-
178
-
179
-
180
-
181
-
182
-
183
-
184
-
185
-
186
-
187
-
188
-
189
-
190
-
191
-
192
-
193
-
194
-
195
-
196
-
197
-
198
-
199
-
200
-
201
-
202
-
203
-
204
-
205
-
206
-
 207
207 -
 208
208 -
 209
209 -
 210
210 -
 211
211 -
 212
212 -
 213
213 -
 214
214 -
 215
215 -
 216
216 -
 217
217 -
218
-
219
-
220
-
221
-
222
-
223
-
224
-
225
-
226
-
227
-
228
-
229
-
230
-
231
-
232
-
233
-
234
-
235
-
236
-
237
-
238
-
239
-
240
-
241
-
242
-
243
-
244
-
245
-
246
-
247
-
248
-
249
-
250
-
251
-
252
-
253
-
254
-
255
-
256
-
257
-
258
-
259
-
260
-
261
-
262
-
263
-
264
-
265
-
266
-
267
-
268
-
269
-
270
-
271
-
272
-
273
-
274
-
275
-
276
-
277
-
278
-
279
-
280
-
281
-
282
-
283
-
284
-
285
-
286
-
287
-
288
-
289
-
290
-
291
-
292
 |
 |
210
MAINTENANCE AND ADJUSTMENT
NOTICE
If dirt gets through into the en-
gine, excessive engine wear and
possibly engine damage will oc-
cur.
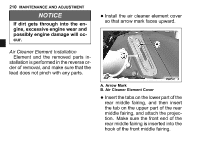
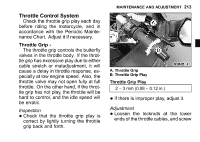
Air Cleaner Element Installation
Element and the removed parts in-
stallation is performed in the reverse or-
der of removal, and make sure that the
lead does not pinch with any parts.
•
Install the air cleaner element cover
so that arrow mark faces upward.
A. Arrow Mark
B. Air Cleaner Element Cover
•
Insert the tabs on the lower part of the
rear middle fairing, and then insert
the tab on the upper part of the rear
middle fairing, and attach the projec-
tion. Make sure the front end of the
rear middle fairing is inserted into the
hook of the front middle fairing.