2015 Kawasaki MULE PRO-FXT Owners Manual - Page 141
2015 Kawasaki MULE PRO-FXT Manual

Page 141 highlights
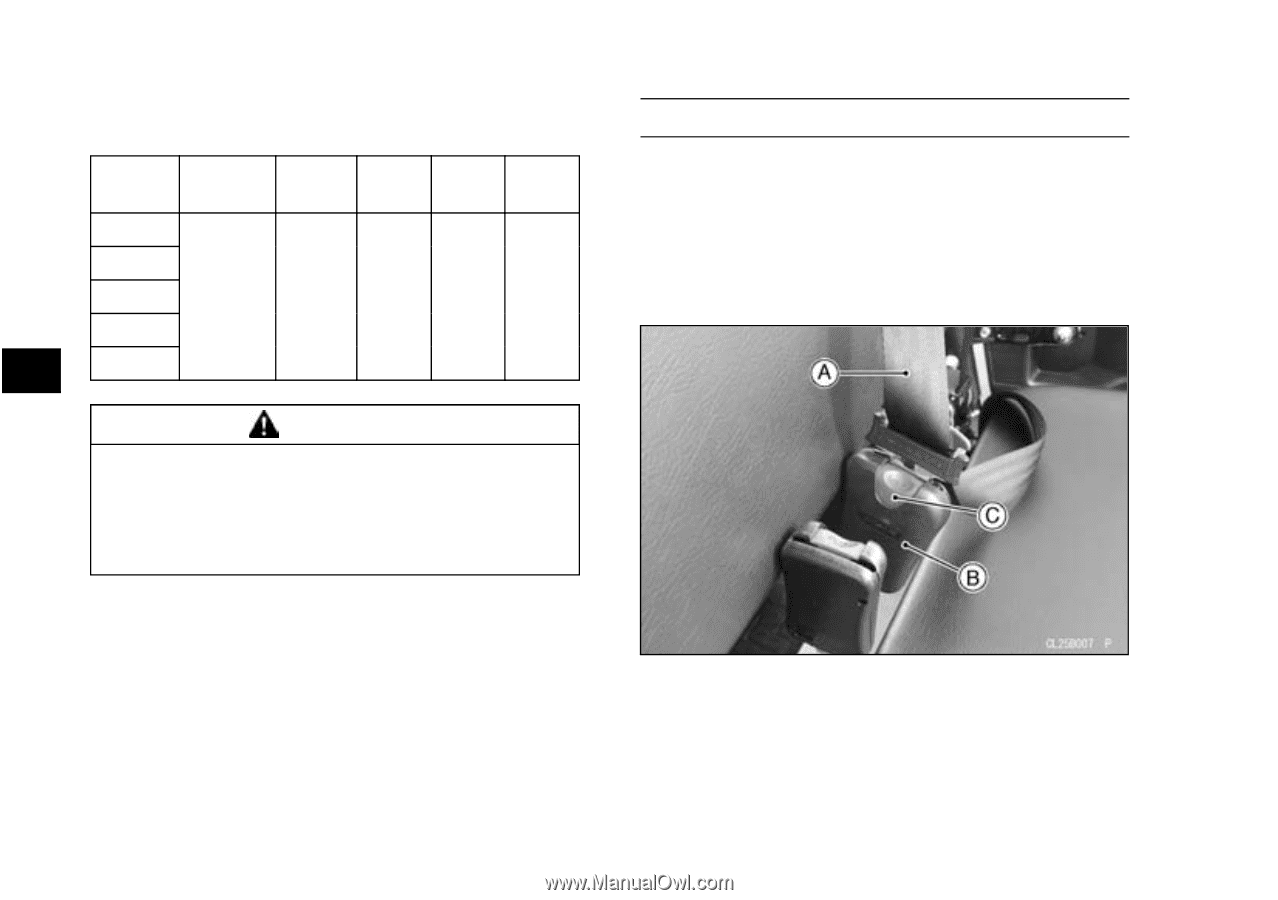
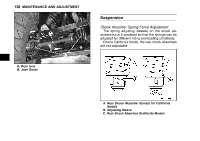
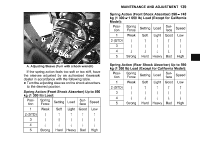
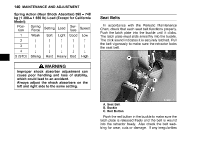
140 MAINTENANCE AND ADJUSTMENT Spring Action (Rear Shock Absorber) 590 ∼ 748 kg (1 300 ∼ 1 650 lb) Load (Except for California Model): PosiSpring SurSetting Load Speed tion Force face 1 2 3 4 5 (STD) Weak | | ↓ Strong Soft ↑ | ↓ Hard Light ↑ | ↓ Heavy Good ↑ | ↓ Bad Low ↑ | ↓ High Seat Belts In accordance with the Periodic Maintenance Chart, check that each seat belt functions properly. Push the latch plate into the buckle until it clicks. The latch plate must slide smoothly into the buckle. The click sound indicates it is securely latched. Pull the belt vigorously to make sure the retractor locks the seat belt. j WARNING Improper shock absorber adjustment can cause poor handling and loss of stability, which could lead to an accident. Always adjust the shock absorbers on the left and right side to the same setting. A. Seat Belt B. Buckle C. Red Button Push the red button in the buckle to make sure the latch plate is released freely and the belt is wound into the retractor freely. Also check the belt webbing for wear, cuts or damage. If any irregularities
-
 1
1 -
2
-
3
-
4
-
5
-
6
-
7
-
8
-
9
-
10
-
11
-
12
-
13
-
14
-
15
-
16
-
17
-
18
-
19
-
20
-
21
-
22
-
23
-
24
-
25
-
26
-
27
-
28
-
29
-
30
-
31
-
32
-
33
-
34
-
35
-
36
-
37
-
38
-
39
-
40
-
41
-
42
-
43
-
44
-
45
-
46
-
47
-
48
-
49
-
50
-
51
-
52
-
53
-
54
-
55
-
56
-
57
-
58
-
59
-
60
-
61
-
62
-
63
-
64
-
65
-
66
-
67
-
68
-
69
-
70
-
71
-
72
-
73
-
74
-
75
-
76
-
77
-
78
-
79
-
80
-
81
-
82
-
83
-
84
-
85
-
86
-
87
-
88
-
89
-
90
-
91
-
92
-
93
-
94
-
95
-
96
-
97
-
98
-
99
-
100
-
101
-
102
-
103
-
104
-
105
-
106
-
107
-
108
-
109
-
110
-
111
-
112
-
113
-
114
-
115
-
116
-
117
-
118
-
119
-
120
-
121
-
122
-
123
-
124
-
125
-
126
-
127
-
128
-
129
-
130
-
131
-
132
-
133
-
134
-
135
-
 136
136 -
 137
137 -
 138
138 -
 139
139 -
 140
140 -
 141
141 -
 142
142 -
 143
143 -
 144
144 -
 145
145 -
 146
146 -
147
-
148
-
149
-
150
-
151
-
152
-
153
-
154
-
155
-
156
-
157
-
158
-
159
-
160
-
161
-
162
-
163
-
164
-
165
-
166
-
167
-
168
-
169
-
170
-
171
-
172
-
173
-
174
-
175
-
176
 |
 |