2015 Kawasaki Vulcan 1700 Voyager ABS Owners Manual - Page 186
2015 Kawasaki Vulcan 1700 Voyager ABS Manual

Page 186 highlights
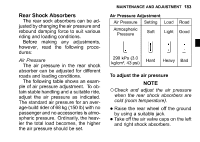
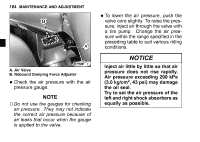
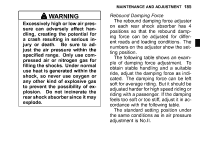
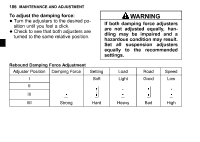
MAINTENANCE AND ADJUSTMENT 185 WARNING Excessively high or low air pressure can adversely affect handling, creating the potential for a crash resulting in serious injury or death. Be sure to adjust the air pressure within the specified range. Only use compressed air or nitrogen gas for filling the shocks. Under normal use heat is generated within the shock, so never use oxygen or any other kind of explosive gas to prevent the possibility of explosion. Do not incinerate the rear shock absorber since it may explode. Rebound Damping Force The rebound damping force adjuster on each rear shock absorber has 4 positions so that the rebound damping force can be adjusted for different roads and loading conditions. The numbers on the adjuster show the setting position. The following table shows an example of damping force adjustment. To obtain stable handling and a suitable ride, adjust the damping force as indicated. The damping force can be left soft for average riding. But it should be adjusted harder for high speed riding or riding with a passenger. If the damping feels too soft or too stiff, adjust it in accordance with the following table. The standard setting position under the same conditions as in air pressure adjustment is No.II.
-
 1
1 -
2
-
3
-
4
-
5
-
6
-
7
-
8
-
9
-
10
-
11
-
12
-
13
-
14
-
15
-
16
-
17
-
18
-
19
-
20
-
21
-
22
-
23
-
24
-
25
-
26
-
27
-
28
-
29
-
30
-
31
-
32
-
33
-
34
-
35
-
36
-
37
-
38
-
39
-
40
-
41
-
42
-
43
-
44
-
45
-
46
-
47
-
48
-
49
-
50
-
51
-
52
-
53
-
54
-
55
-
56
-
57
-
58
-
59
-
60
-
61
-
62
-
63
-
64
-
65
-
66
-
67
-
68
-
69
-
70
-
71
-
72
-
73
-
74
-
75
-
76
-
77
-
78
-
79
-
80
-
81
-
82
-
83
-
84
-
85
-
86
-
87
-
88
-
89
-
90
-
91
-
92
-
93
-
94
-
95
-
96
-
97
-
98
-
99
-
100
-
101
-
102
-
103
-
104
-
105
-
106
-
107
-
108
-
109
-
110
-
111
-
112
-
113
-
114
-
115
-
116
-
117
-
118
-
119
-
120
-
121
-
122
-
123
-
124
-
125
-
126
-
127
-
128
-
129
-
130
-
131
-
132
-
133
-
134
-
135
-
136
-
137
-
138
-
139
-
140
-
141
-
142
-
143
-
144
-
145
-
146
-
147
-
148
-
149
-
150
-
151
-
152
-
153
-
154
-
155
-
156
-
157
-
158
-
159
-
160
-
161
-
162
-
163
-
164
-
165
-
166
-
167
-
168
-
169
-
170
-
171
-
172
-
173
-
174
-
175
-
176
-
177
-
178
-
179
-
180
-
 181
181 -
 182
182 -
 183
183 -
 184
184 -
 185
185 -
 186
186 -
 187
187 -
 188
188 -
 189
189 -
 190
190 -
 191
191 -
192
-
193
-
194
-
195
-
196
-
197
-
198
-
199
-
200
-
201
-
202
-
203
-
204
-
205
-
206
-
207
-
208
-
209
-
210
-
211
-
212
-
213
-
214
-
215
-
216
-
217
-
218
-
219
-
220
-
221
-
222
-
223
-
224
-
225
-
226
-
227
-
228
-
229
-
230
-
231
-
232
-
233
-
234
-
235
-
236
-
237
-
238
-
239
-
240
-
241
-
242
-
243
-
244
 |
 |