2015 Kawasaki Vulcan 1700 Voyager ABS Owners Manual - Page 200
2015 Kawasaki Vulcan 1700 Voyager ABS Manual

Page 200 highlights
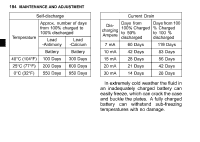
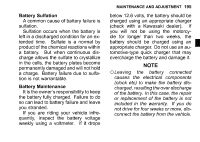
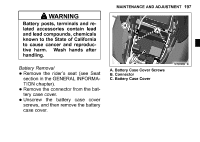
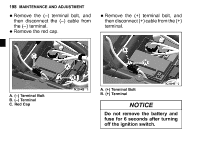
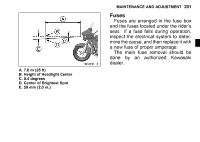
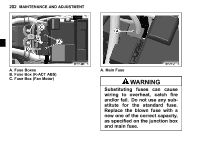
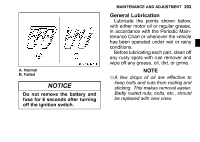
MAINTENANCE AND ADJUSTMENT 199 the battery using a solution of • Clean baking soda and water. Be sure that the cable connections ate clean. Battery Installation Connect the (+) cable into the (+) terminal, and then tighten the (+) terminal bolt into the (+) terminal. Connect the (-) cable into the (-) terminal, and then tighten the (-) terminal bolt into the (-) terminal. ○When NOTE • • installing the battery, the speedometer needle may momentary point to the last reading. If the battery is disconnected while the meter needle is moving, the needle will stop on its way, but will normally return when the battery is connected again. NOTICE Installing the (−) cable to the (+) terminal of the battery or the (+) cable to the (−) terminal of the battery can seriously damage the electrical system. a light coat of grease on the ter• Put minals to prevent corrosion. the terminals with its protec• Cover tive cap. the battery case cover, and • Install tighten the battery case cover • Reinstall the removed parts. screws.
-
 1
1 -
2
-
3
-
4
-
5
-
6
-
7
-
8
-
9
-
10
-
11
-
12
-
13
-
14
-
15
-
16
-
17
-
18
-
19
-
20
-
21
-
22
-
23
-
24
-
25
-
26
-
27
-
28
-
29
-
30
-
31
-
32
-
33
-
34
-
35
-
36
-
37
-
38
-
39
-
40
-
41
-
42
-
43
-
44
-
45
-
46
-
47
-
48
-
49
-
50
-
51
-
52
-
53
-
54
-
55
-
56
-
57
-
58
-
59
-
60
-
61
-
62
-
63
-
64
-
65
-
66
-
67
-
68
-
69
-
70
-
71
-
72
-
73
-
74
-
75
-
76
-
77
-
78
-
79
-
80
-
81
-
82
-
83
-
84
-
85
-
86
-
87
-
88
-
89
-
90
-
91
-
92
-
93
-
94
-
95
-
96
-
97
-
98
-
99
-
100
-
101
-
102
-
103
-
104
-
105
-
106
-
107
-
108
-
109
-
110
-
111
-
112
-
113
-
114
-
115
-
116
-
117
-
118
-
119
-
120
-
121
-
122
-
123
-
124
-
125
-
126
-
127
-
128
-
129
-
130
-
131
-
132
-
133
-
134
-
135
-
136
-
137
-
138
-
139
-
140
-
141
-
142
-
143
-
144
-
145
-
146
-
147
-
148
-
149
-
150
-
151
-
152
-
153
-
154
-
155
-
156
-
157
-
158
-
159
-
160
-
161
-
162
-
163
-
164
-
165
-
166
-
167
-
168
-
169
-
170
-
171
-
172
-
173
-
174
-
175
-
176
-
177
-
178
-
179
-
180
-
181
-
182
-
183
-
184
-
185
-
186
-
187
-
188
-
189
-
190
-
191
-
192
-
193
-
194
-
 195
195 -
 196
196 -
 197
197 -
 198
198 -
 199
199 -
 200
200 -
 201
201 -
 202
202 -
 203
203 -
 204
204 -
 205
205 -
206
-
207
-
208
-
209
-
210
-
211
-
212
-
213
-
214
-
215
-
216
-
217
-
218
-
219
-
220
-
221
-
222
-
223
-
224
-
225
-
226
-
227
-
228
-
229
-
230
-
231
-
232
-
233
-
234
-
235
-
236
-
237
-
238
-
239
-
240
-
241
-
242
-
243
-
244
 |
 |