3Ware 9650SE-8LPML-SGL Installation Guide - Page 16
ESD (Electrostatic Discharge) Precautions, Installation Considerations, Air Flow, Cable Length
 |
UPC - 693494600087
View all 3Ware 9650SE-8LPML-SGL manuals
Add to My Manuals
Save this manual to your list of manuals |
Page 16 highlights
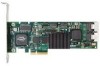
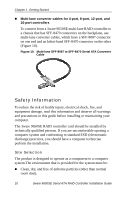
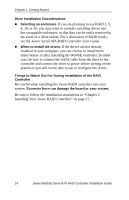
Chapter 1. Getting Started ESD (Electrostatic Discharge) Precautions To avoid damaging computer components and accessories when installing or removing the 3ware RAID controller, follow standard electrostatic discharge (ESD) precautions: „ When your computer case is open and its internal parts are exposed, do not touch any internal part unnecessarily. „ Always wear a grounded strap or work on an ESD-protective mat. „ Do not remove the 3ware RAID controller from its protective bag until you are properly grounded. „ Handle the 3ware RAID controller by its edges or by the black rail and metal bracket at its two ends. „ Do not touch any pin, contact, lead or component on the 3ware RAID controller. Installation Considerations Air Flow, Cable Length, and Routing Space Adequate airflow and ventilation are particularly important for 3ware 9650SE RAID controllers. The on-board heat sink collects heat, and must have adequate airflow in order to disburse it. It is important that the cables do not obstruct the air flow or prevent proper ventilation of the system. Selecting the Slot in Which to Install the Controller Consider these factors when deciding on the slot in which to insert the controller: „ Cable routing may be easier if you install the 3ware RAID controller next to an open slot. „ 3ware 9650SE RAID controllers must be installed in PCI Express® slots. Table 1 on page 3 shows the type of PCI Express slot required for each 9650SE model. 12 3ware 9650SE Serial ATA RAID Controller Installation Guide
-
 1
1 -
2
-
3
-
4
-
5
-
6
-
7
-
8
-
9
-
10
-
 11
11 -
 12
12 -
 13
13 -
 14
14 -
 15
15 -
 16
16 -
 17
17 -
 18
18 -
 19
19 -
 20
20 -
 21
21 -
22
-
23
-
24
-
25
-
26
-
27
-
28
-
29
-
30
-
31
-
32
-
33
-
34
-
35
-
36
-
37
-
38
-
39
-
40
-
41
-
42
-
43
-
44
-
45
 |
 |