3Ware 9650SE-8LPML-SGL Installation Guide - Page 22
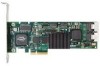
Step 2. Install the Controller in the Computer, 9650SE RAID controller. - card
 |
UPC - 693494600087
View all 3Ware 9650SE-8LPML-SGL manuals
Add to My Manuals
Save this manual to your list of manuals |
Page 22 highlights
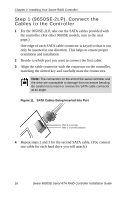
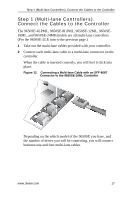
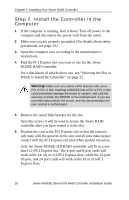
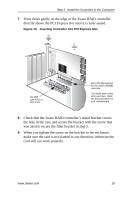
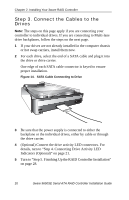
Chapter 2. Installing Your 3ware RAID Controller Step 2. Install the Controller in the Computer 1 If the computer is running, shut it down. Turn off power to the computer and disconnect the power cord from the outlet. 2 Make sure you are properly grounded. (For details about safety precautions, see page 10.) 3 Open the computer case according to the manufacturer's instructions. 4 Find the PCI Express slot you want to use for the 3ware 9650SE RAID controller. For a discussion of which slot to use, see "Selecting the Slot in Which to Install the Controller" on page 12. Warning! Make sure you select a PCI Express slot, not a PCI or PCI-X slot. Inserting a 9650SE into a PCI or PCI-X slot could potentially damage the board or system, and void the warranty of either the 9650SE or the motherboard. If you are uncertain about which slot to use, see the documentation for your system's motherboard. 5 Remove the metal filler bracket for the slot. Save this screw; it will be used to secure the 3ware RAID controller after you have seated it in the slot. 6 Position the card in the PCI Express slot so that the contacts will mate with the grooves in the slot, and all pins make proper contact with the PCI Express slot pins when pushed into place. Only the 3ware 9650SE-2LP RAID controller will fit in a one lane (x1) PCI Express slot. The 4-port and 8-port cards will work in the x4, x8, or x16 PCI Express slots, while the 12-port, 16-port, and 24-port cards will work in the x8 or x16 PCI Express slots. 18 3ware 9650SE Serial ATA RAID Controller Installation Guide
-
 1
1 -
2
-
3
-
4
-
5
-
6
-
7
-
8
-
9
-
10
-
11
-
12
-
13
-
14
-
15
-
16
-
 17
17 -
 18
18 -
 19
19 -
 20
20 -
 21
21 -
 22
22 -
 23
23 -
 24
24 -
 25
25 -
 26
26 -
 27
27 -
28
-
29
-
30
-
31
-
32
-
33
-
34
-
35
-
36
-
37
-
38
-
39
-
40
-
41
-
42
-
43
-
44
-
45
 |
 |