Acer INTPJ-STK1 User Manual
Acer INTPJ-STK1 Manual
 |
View all Acer INTPJ-STK1 manuals
Add to My Manuals
Save this manual to your list of manuals |
Acer INTPJ-STK1 manual content summary:
- Acer INTPJ-STK1 | User Manual - Page 1
Smart Touch Kit MANUAL - Acer INTPJ-STK1 | User Manual - Page 2
Contents Introduction and Features 1 Hardware Installation 3 Hardware Adjustment 5 Calibration Software 10 Gesture recogination Introduction 15 Application Software 16 Common Malfunction Analysis 19 - Acer INTPJ-STK1 | User Manual - Page 3
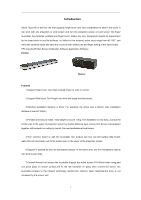
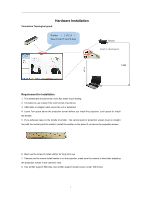
. Our product can turn any flat surface (like board, wall,LCD) into touchable; just fix the emitter part on the upper of the projection screen. 6,Support to operate by any non-transparent objects. In the active area, any non-transparent objects can work as pen does. 7,Convert Normal Led screen into - Acer INTPJ-STK1 | User Manual - Page 4
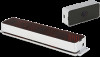
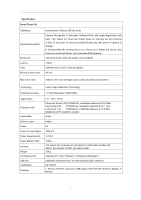
Calibration Gesture Recognition Multi-touch Latency Filter Minimum Active Size Automatic(5s) / Manual (25/36 points) Gesture Recognition In Education Software:Write with single finger,Erase software) CE, ROHS 1. Sensor 2.Emitter 3.Mounts 4.USB cable (12m) 5.Pionter 6.Power Adaptor 7. Manual 2 - Acer INTPJ-STK1 | User Manual - Page 5
the mount install beside or on the projector, make sure the camera is fixed after adjusting the projection screen in the camera's view. 8. One emitter support 90inches, two emitter support double screen under 180 inches. 3 - Acer INTPJ-STK1 | User Manual - Page 6
Installation Step 1: Put a adhesive tape on the back of the emitter body,and attach emitter on the middle upper of the projection screen and distance 3cm to the upper edge of the projection screen.,fixed the emitter by 4 screws(as below Pic1) Emitter Note: if you use double screen Smart Touch Kit, - Acer INTPJ-STK1 | User Manual - Page 7
Step 2: Sensor Installation: attach it to projector or attach it on ceiling. Make sure the Capture viewing is erected. For 80" active size (Projection screen), the installation distance is about 1m-1.2m for short throw Sensor part, 0.6-0.8m short throw Sensor and about 2.2m-3.2m for long throw - Acer INTPJ-STK1 | User Manual - Page 8
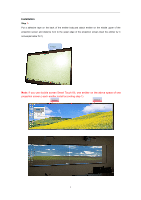
Open the folder "Application Software'',double click "GLboard_Setup.exe" Click "next step" until it fished. There will be a icon of GLboard on the desktop. Step 2. Adjust the camera Chose "Installation and debugging"-"Mode 1", then you can see the whole projection screen clearly (As Pic3). *** - Acer INTPJ-STK1 | User Manual - Page 9
Then please right click in the image, chose "exchange the image", then it will be right as Pic5: The image in the square is left camera's view The image in the square is right camera's view Pic5 Step 3. Adjust the emitter 1. The standard:Chose "Installation and debugging"-"Mode 2". In this mode, - Acer INTPJ-STK1 | User Manual - Page 10
7 Pic 7 Note: If use double screen, adjust the emitter at the same way. Step 4. There are two calibrations way: one is auto calibration, one is manual calibration. You can choose the one you like. Calibration:software will figure out the position of the mouse by accurate calculating,and finger will - Acer INTPJ-STK1 | User Manual - Page 11
If you cannot do auto calibration, then you can do manual calibration. 1, Please choose "Auto Mask Clutter" from "Mask If you can see the spot as below, then you do next step. Pic9 3, Click "Manual Calibration" in the "Operation". Then you will see , touch the cross. Please use finger to - Acer INTPJ-STK1 | User Manual - Page 12
Introduction Calibration Software Operation menu list Operation menu list including run,stop,parameter setting,Auto Mask Clutter,Manual Mask Area,Manual Calibration,Automatic Calibration,Lightspot Sampling,Disable Optical Pen Control and Exit. 1. Run:run the calibration software and start the - Acer INTPJ-STK1 | User Manual - Page 13
(1) Normal Use setting Set the Proportion of the spot(20%-80%):to set how large the spot will cause the sensor to detect. The Brightness coefficient(0-255):adjust camera's sensitive to the light in normal usage mode. The higher numbers mean the camera more sensitive to the light. (2) Auto- - Acer INTPJ-STK1 | User Manual - Page 14
you are using,users can run and stop any one gesture recognition according to the requirements. this function is mainly able to support the third-party software to operate with gesture recognition. (5) GLBOARD gesture recognition config Start all GLBOARD gesture recognition:click this function,it - Acer INTPJ-STK1 | User Manual - Page 15
Bitmap Edit" or you can press Ctrl+Shift+A. The software will specify the active area automatically. The other area will be shielded by green mask. 5. Manual edition mask area After auto mask clutter,check whether the whole active size is included,draw line along with the four edges of the active - Acer INTPJ-STK1 | User Manual - Page 16
Calibration Click "Manual Calibration" in the "Operation". Then you will see , touch the cross. Please use finger to touch the dot shown on the screen, another dot then - Acer INTPJ-STK1 | User Manual - Page 17
Mouse Operations and Gesture Recognitions Mouse operations Single Click:single finger click Double Click:single finger click two times continually at the same position. Right Click:single finger stays 2-3s for opening right click function at the same position. Scroll Bar:open one website,single - Acer INTPJ-STK1 | User Manual - Page 18
Usage of GLboard Introduction of the main toolbar When you use the GLboard at first time, double click GL-board To pen the software, interface includes three areas as following: Operate area: picture or text edit Toolbar Function of Each button in the tool bar iron Name Start menu function - Acer INTPJ-STK1 | User Manual - Page 19
Pen Write like a ball pen brush Write like Chinese brush pen Smart pen Convert the drawing to typewriting geometric shapes. Multi-writing Support ten persons writing simultaneously mode Insert shape Several shapes can be chose, such as triangle, square ,circle and so on Import picture Insert - Acer INTPJ-STK1 | User Manual - Page 20
When you click , then you back to the desktop, GLboard will be floating toolbar Icon Name windows Function Back to the desktop Pen Write like a ball pen New page Open a new white page New page Open a new black page Back Go back to the previous page Forward Erase Forward to next page - Acer INTPJ-STK1 | User Manual - Page 21
Start menu list Manu File Export Print Preview Print Screen Shot Change background Submenu Function Description New File Create a blank file, if you have not been saved before, there will be display a save message. Open File Open the existing PPT, PDF, PTS file Save File Save the compiling - Acer INTPJ-STK1 | User Manual - Page 22
Screen background Chose the Desktop as background Other background Chose the background color by yourself. Insert a hyperlink Insert the hyperlink, could open the relative page link directly Shear Shearing the selected word and image Copy Copy file from one place to another place, and save - Acer INTPJ-STK1 | User Manual - Page 23
to 140,adjust the value of gray light to 250. (4) After adjusting the parameter ,but it still can't do auto-calibration,pls do manual calibration or contact technician. 4. Install the device according to the requirement,and the auto-calibration is successful.anyway the operation is not sensitivity - Acer INTPJ-STK1 | User Manual - Page 24
method carefully. Before you install the product, please fully understand some safe use information of the guide. It could help you avoid some mistake to cause the product's broken and other safe problem. Warning: Please don't look straightly the light of the projector, it will harmful to your eyes
-
 1
1 -
 2
2 -
 3
3 -
 4
4 -
 5
5 -
 6
6 -
 7
7 -
8
-
9
-
10
-
11
-
12
-
13
-
14
-
15
-
16
-
17
-
18
-
19
-
20
-
21
-
22
-
23
-
24
 |
 |

Smart Touch Kit
MANUAL