Adaptec 1405 User Guide - Page 23
Checking Your Controller and Devices, Setting the Boot Controller, Enter the system BIOS Setup.
 |
View all Adaptec 1405 manuals
Add to My Manuals
Save this manual to your list of manuals |
Page 23 highlights
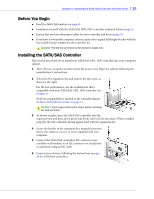
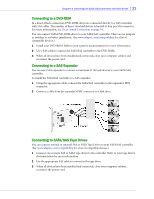
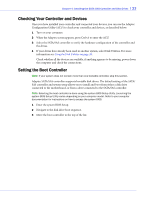
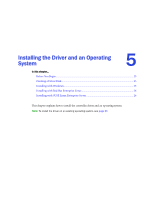
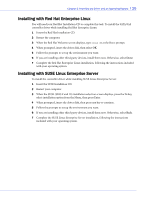
Chapter 4: Installing the SATA/SAS Controller and Disk Drives l 23 Checking Your Controller and Devices Once you have installed your controller and connected your devices, you can use the Adaptec Configuration Utility (ACU) to check your controller and devices, as described below: 1 Turn on your computer. 2 When the Adaptec screen appears, press Ctrl+A to enter the ACU. 3 Select the SATA/SAS controller to verify the hardware configuration of the controller and the drives. 4 If your drives have already been used in another system, select Disk Utilities. For more information see Using the Disk Utilities on page 35. Check whether all the devices are available, if anything appears to be missing, power down the computer and check the connections. Setting the Boot Controller Note: If your system does not contain more than one bootable controller, skip this section. Adaptec SATA/SAS controllers supports bootable disk drives. The default setting of the SATA/ SAS controller and system setup allows you to install and boot from either a disk drive connected to the motherboard, or from a drive connected to the SATA/SAS controller. Note: Selecting the boot controller is done using the system BIOS Setup Utility. Launching the system BIOS Setup Utility varies depending on your computer model. Refer to your computer documentation for instructions on how to access the system BIOS. 1 Enter the system BIOS Setup. 2 Navigate to the disk drive boot sequence. 3 Move the boot controller to the top of the list.
-
 1
1 -
2
-
3
-
4
-
5
-
6
-
7
-
8
-
9
-
10
-
11
-
12
-
13
-
14
-
15
-
16
-
17
-
 18
18 -
 19
19 -
 20
20 -
 21
21 -
 22
22 -
 23
23 -
 24
24 -
 25
25 -
 26
26 -
 27
27 -
 28
28 -
29
-
30
-
31
-
32
-
33
-
34
-
35
-
36
-
37
-
38
-
39
-
40
-
41
-
42
-
43
-
44
-
45
-
46
-
47
-
48
-
49
-
50
-
51
-
52
-
53
-
54
-
55
-
56
-
57
-
58
-
59
-
60
-
61
-
62
-
63
-
64
-
65
-
66
-
67
-
68
-
69
 |
 |