Adaptec 1405 User Guide - Page 36
Verify Disk Media, Indicate a LED, Blink LED on all drives, Blink LED on specific drive
 |
View all Adaptec 1405 manuals
Add to My Manuals
Save this manual to your list of manuals |
Page 36 highlights
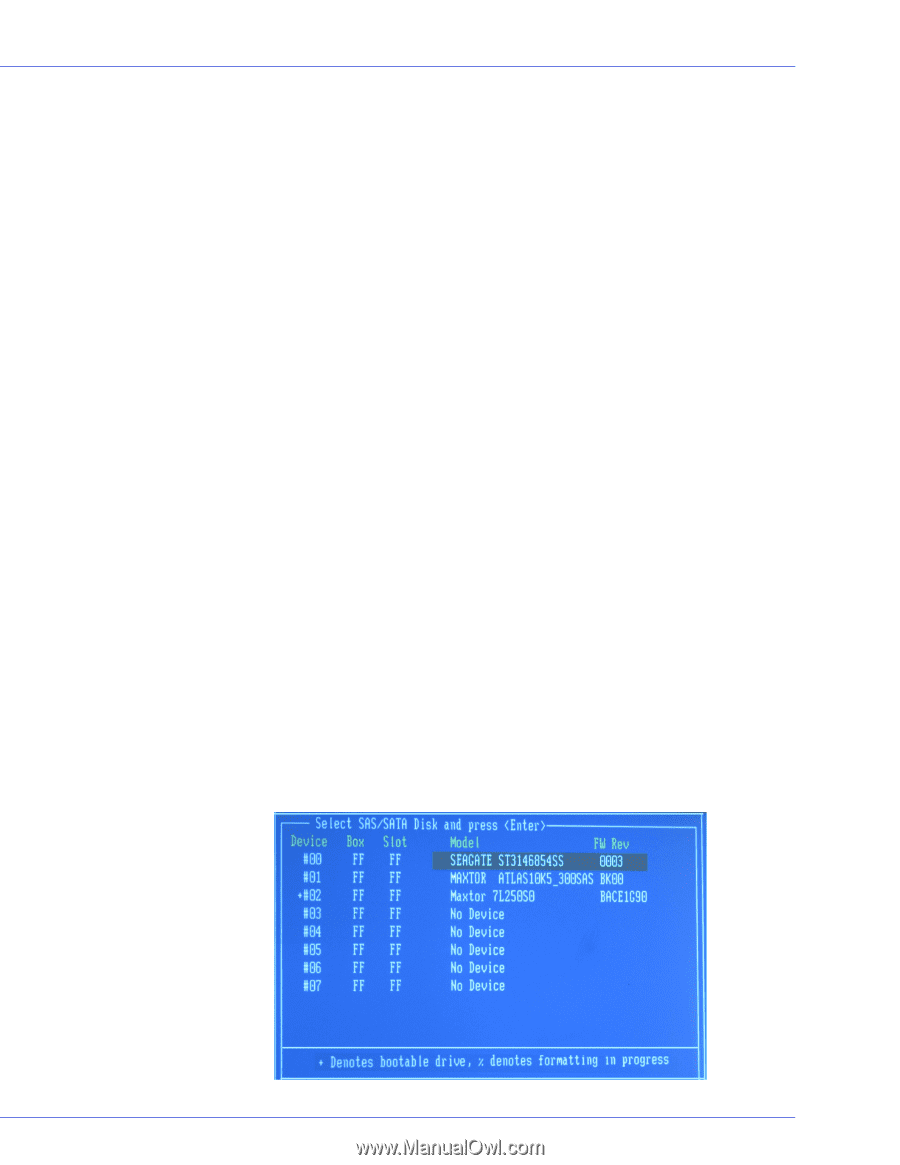
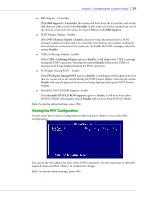
Chapter 7: Configuring the Controller Utility l 36 2 Now select Verify Disk Media and press . 3 A confirmation window appears. Click Yes to verify the disk or No to cancel. Locating a Disk 1 Select the disk you want to locate and press . 2 Now select Indicate a LED and press . The following options are displayed. ● Blink LED on all drives - Use this option to blink on all drives to ensure that the drives are working properly. ● Blink LED on specific drive - Use this option to locate a specific drive. Enabling/Disabling a Write Cache 1 Select the device/disk and press . 2 Now select Write Cache Setting and press . ● Select Enable to enable the Drive Write Cache and improve I/O performance. ● Select Disable to disable the Drive Write Cache and minimize I/O performance. Viewing the PHY connection rate for the Disk 1 Select the device/disk and press . 2 Now select Connection Rate and press . 3 The PHY connection rate of the device/disk is displayed. Setting a Bootable Device 1 Select the device you wish to mark as a bootable device and press . 2 Now select Set Bootable and press . ● Select Enable to boot from the device. ● Select Disable to disable the marked bootable device. Note: You can set only one device as a bootable device.
-
 1
1 -
2
-
3
-
4
-
5
-
6
-
7
-
8
-
9
-
10
-
11
-
12
-
13
-
14
-
15
-
16
-
17
-
18
-
19
-
20
-
21
-
22
-
23
-
24
-
25
-
26
-
27
-
28
-
29
-
30
-
 31
31 -
 32
32 -
 33
33 -
 34
34 -
 35
35 -
 36
36 -
 37
37 -
 38
38 -
 39
39 -
 40
40 -
 41
41 -
42
-
43
-
44
-
45
-
46
-
47
-
48
-
49
-
50
-
51
-
52
-
53
-
54
-
55
-
56
-
57
-
58
-
59
-
60
-
61
-
62
-
63
-
64
-
65
-
66
-
67
-
68
-
69
 |
 |