Adobe 26001648 Migration Guide - Page 33
Type on a path, Linking text objects
 |
UPC - 883919060125
View all Adobe 26001648 manuals
Add to My Manuals
Save this manual to your list of manuals |
Page 33 highlights
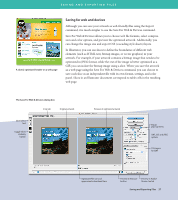
WORKING WITH TEXT Type on a path In FreeHand, you attach text to a path; Illustrator lets you type text on a path. You can then move or flip text along the path by dragging the handles that appear on the sides of the text. Choose Type > Type On A Path to specify effects and other options, such as spacing. How do I position two paragraphs around a circle like in FreeHand? In FreeHand, you can press the Return or Enter to align a second paragraph of text in the lower part of an object. In Illustrator, you must first divide the object into two sections with the Scissors tool, and then you can flow the text along one path and onto the second path by linking the text objects. Type path effects include (from top to bottom) Rainbow, Skew, and 3D Ribbon. Tip: Illustrator CS3 threads text between objects. Click the in or out port of a selected type object, and then click and drag the loaded text icon to create a second threaded object. To break a thread, select a linked type object, and then double-click the port on either end of the thread. Linking text objects If you want to insert text that will flow from one text area to another, you must link them. Each area type object contains an in port and an out port; an empty port indicates that all the text is visible and that the object isn't linked. An arrow in a port indicates that the object is linked to another object. A red plus sign in an out port indicates that the object contains additional text (overflow text). In port Out port Thread Overflow text indicator When working with text that threads among objects, it can be useful to show the threads; if they are hidden, choose View > Show Text Threads, and then select a linked object. How do I create rows and columns in a text area? In FreeHand, you create multiple columns and rows in the Object panel; in Illustrator, you use the Area Type Options dialog box. Select the text box in which you want to add columns or rows, and choose Type > Area Type Options. Working with Text 33
-
 1
1 -
2
-
3
-
4
-
5
-
6
-
7
-
8
-
9
-
10
-
11
-
12
-
13
-
14
-
15
-
16
-
17
-
18
-
19
-
20
-
21
-
22
-
23
-
24
-
25
-
26
-
27
-
 28
28 -
 29
29 -
 30
30 -
 31
31 -
 32
32 -
 33
33 -
 34
34 -
 35
35 -
 36
36 -
 37
37 -
 38
38 -
39
-
40
-
41
-
42
-
43
-
44
-
45
-
46
-
47
-
48
 |
 |
