Adobe 38043740 User Guide - Page 91
Installing Verity Locales
 |
UPC - 883919135168
View all Adobe 38043740 manuals
Add to My Manuals
Save this manual to your list of manuals |
Page 91 highlights
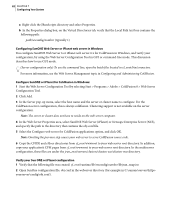
ADOBE COLDFUSION 8 87 Installing and Using ColdFusion 4 Select the Configure Web Server For ColdFusion Applications option and click Add. 5 Edit both the magnus.conf file and the obj.conf file (located in the sun_install_dir/server_instance/conf directory) by commenting lines that contain j2ee. 6 Go to the sun_install_dir/bin directory. 7 Execute the following command: ./wadm pull-config --user=admin --port=(admin_port) --config=(server_instance) admin_instance Unconfigure Sun Web Server 7 on Solaris 1 Launch the cfroot/runtime/bin launch wsconfig tool. 2 Select Sun ONE Web Server, and then click Remove. 3 Edit both the magnus.conf file and the obj.conf file (located in the sun_install_dir/server_instance/conf directory) by uncommenting lines that contain j2ee. 4 Go to the sun_install_dir/bin directory. 5 Execute the following command: ./wadm pull-config --user=admin --port=(admin_port) --config=(server_instance) admin_instance Installing Verity Locales ColdFusion lets you do Verity searches for languages other than English. For more information on Verity, see Configuring and Administering ColdFusion. This section describes how to install a Verity Locales package from the ColdFusion DVD or Adobe website, and how to switch to a different Verity Locales package. Install Verity Locales 1 Do one of the following: a Copy the appropriate Verity Locales package from the ColdFusion DVD to the [verity]/k2/common directory.
-
 1
1 -
2
-
3
-
4
-
5
-
6
-
7
-
8
-
9
-
10
-
11
-
12
-
13
-
14
-
15
-
16
-
17
-
18
-
19
-
20
-
21
-
22
-
23
-
24
-
25
-
26
-
27
-
28
-
29
-
30
-
31
-
32
-
33
-
34
-
35
-
36
-
37
-
38
-
39
-
40
-
41
-
42
-
43
-
44
-
45
-
46
-
47
-
48
-
49
-
50
-
51
-
52
-
53
-
54
-
55
-
56
-
57
-
58
-
59
-
60
-
61
-
62
-
63
-
64
-
65
-
66
-
67
-
68
-
69
-
70
-
71
-
72
-
73
-
74
-
75
-
76
-
77
-
78
-
79
-
80
-
81
-
82
-
83
-
84
-
85
-
 86
86 -
 87
87 -
 88
88 -
 89
89 -
 90
90 -
 91
91 -
 92
92 -
 93
93 -
 94
94 -
 95
95 -
 96
96 -
97
-
98
-
99
-
100
-
101
-
102
-
103
-
104
-
105
-
106
-
107
-
108
-
109
-
110
-
111
-
112
 |
 |
