Alpine HCE-C305R Owners Manual - Page 33
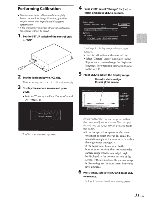
Press VIEW, select Vehicle Width:'
 |
View all Alpine HCE-C305R manuals
Add to My Manuals
Save this manual to your list of manuals |
Page 33 highlights
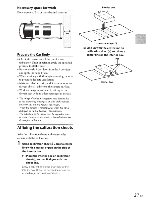
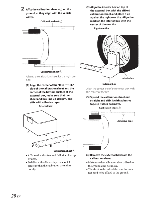
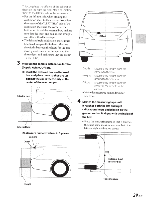
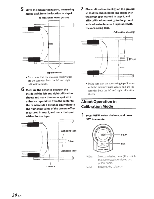
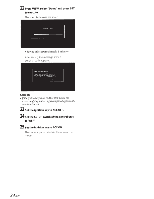
7 Press SET. repeatedly to change the value of "Depth:' 10 Press VIEW, select "Vehicle Width:' and press SET. repeatedly to change the value. You can specify the depth in 0.5 inch/1 em increments by pressing SET.. Setting value: 0 to 11.5 inches/0 to 30 em 8 Press VIEW, select "Height:' and press SET. repeatedly to change the value. You can specify the height from the ground to the camera in 0.5 inch/1 em increments by pressing SET.. Setting value: 17 to 51 inches/ 43 to 130 em 9 Press VIEW, select "Offset:' and press SET. repeatedly to change the value. You can specify the car width in 2 inchs/ 5 em increments by pressing SET.. Setting value: 56 to 86 inches/ 140 to 220 em • Do not specify a value less than the actual car width. • If there is no setting that matches the vehicle width, set the nearest value larger than the actual vehicle width. 11 Press VIEW, select 11Next:' and press SET. to execute. The Camera Angle Adjustment screen appears. 12 Press SET. repeatedly until the calibration sheet is parallel to the orange lines. You can specify the offset value in 0.5 inch/1 em increments by pressing SET.. Setting value: - 15.5 to+ 15.5 inches/ -40 to +40 em • The right side of the vehicle is plus and the left side is minus. You can specify the angle in 0.5° increments by pressing SET.. Pressing VIEW repeatedly selects the left arrow, right arrow, "Next" switch, left arrow, etc. • A slight lag time exists between pressing the switch and the screen display change. 13 Press VIEW, select "Next:' and press SET. to execute. The Camera Angle Adjustment screen appears. 32-EN
-
 1
1 -
2
-
3
-
4
-
5
-
6
-
7
-
8
-
9
-
10
-
11
-
12
-
13
-
14
-
15
-
16
-
17
-
18
-
19
-
20
-
21
-
22
-
23
-
24
-
25
-
26
-
27
-
 28
28 -
 29
29 -
 30
30 -
 31
31 -
 32
32 -
 33
33 -
 34
34 -
 35
35 -
 36
36 -
 37
37 -
 38
38 -
39
-
40
-
41
-
42
-
43
 |
 |
