Alpine HCE-C305R Owners Manual - Page 34
View. - active view
 |
View all Alpine HCE-C305R manuals
Add to My Manuals
Save this manual to your list of manuals |
Page 34 highlights
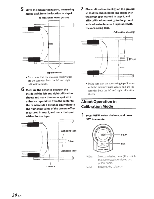
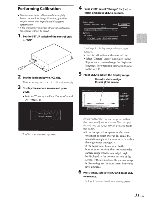
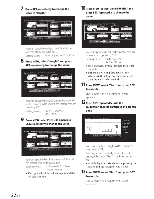
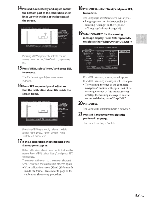
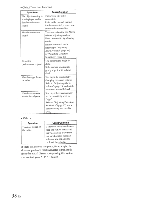
14 Press SET. repeatedly and adjust so that the bottom part of the calibration sheet lines up with the line at the bottom of the screen. 18 Press VIEW, select"Next;' and press SET. to execute. The Language selection screen will appear. • Language selection is also possible by selecting "Change" on the "Options" - "Language" of step 4 (page 31). 19 Select "ON/OFF" for the warning message display. Press SET. repeatedly to select either "Disp/ON" or "Disp/OFF:' Pressing VIEW repeatedly selects the up arrow, down arrow,"Next" switch, up arrow, etc. 15 Press VIEW, select "Next:' and press SET. to execute. The Camera Angle Adjustment screen appears. 16 Press SET. repeatedly and adjust so that the calibration sheet fits inside the screen frame. Pressing VIEW repeatedly selects the left arrow, right arrow, "Retry" switch,"Next" switch, left arrow, etc. 17 If the 3 calibration sheets fit inside the frames go to step 18. If the calibration sheet does not fit insides the frame, Press VIEW, select "Retry" and press SET. to execute. The screen will return to the screen shown in Step 12 to start the calibration process again. • If the calibration sheets G)and® do not fit inside the frame. Please refer to page 27 for calibration sheet setup procedure. Disp/ON: Warning messages will appear. Disp/OFF: Warning messages will not appear. • The warning message of the connected navigation/monitor will appear first. If the warning message of this camera system overlaps the warning message of another connected device, set to ''Disp/OFF:" 20 Press VIEW. The Language selection mode is activated. 21 Press SET. repeatedly to select the preferred language. The default setting is English. 33-EN
-
 1
1 -
2
-
3
-
4
-
5
-
6
-
7
-
8
-
9
-
10
-
11
-
12
-
13
-
14
-
15
-
16
-
17
-
18
-
19
-
20
-
21
-
22
-
23
-
24
-
25
-
26
-
27
-
28
-
 29
29 -
 30
30 -
 31
31 -
 32
32 -
 33
33 -
 34
34 -
 35
35 -
 36
36 -
 37
37 -
 38
38 -
 39
39 -
40
-
41
-
42
-
43
 |
 |
