Arlo Pro 2 User Manual - Page 11
Use camera positioning mode, Device Utilities > Camera Positioning
 |
View all Arlo Pro 2 manuals
Add to My Manuals
Save this manual to your list of manuals |
Page 11 highlights
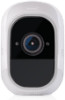
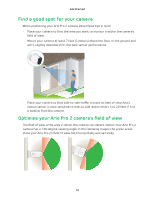
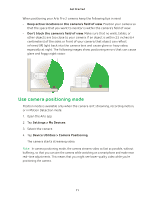
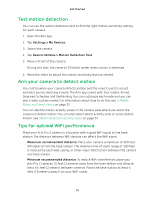
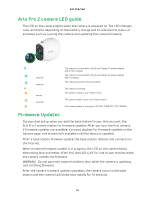
Get Started When positioning your Arlo Pro 2 camera, keep the following tips in mind: • Keep active locations in the camera's field of view. Position your camera so that the space that you want to monitor is within the camera's field of view. • Don't block the camera's field of view. Make sure that no walls, tables, or other objects are too close to your camera. If an object is within 2.5 inches (6.4 centimeters) of the sides or front of your camera, that object can reflect infrared (IR) light back into the camera lens and cause glare or hazy video, especially at night. The following images show positioning errors that can cause glare and foggy night vision: Use camera positioning mode Position mode is available only when the camera isn't streaming, recording motion, or in Motion Detection mode. 1. Open the Arlo app. 2. Tap Settings > My Devices. 3. Select the camera. 4. Tap Device Utilities > Camera Positioning. The camera starts streaming video. Note: In camera positioning mode, the camera streams video as fast as possible, without buffering, so that you can aim the camera while watching on a smartphone and make near real-time adjustments. This means that you might see lower-quality video while you're positioning the camera. 11
-
 1
1 -
2
-
3
-
4
-
5
-
 6
6 -
 7
7 -
 8
8 -
 9
9 -
 10
10 -
 11
11 -
 12
12 -
 13
13 -
 14
14 -
 15
15 -
 16
16 -
17
-
18
-
19
-
20
-
21
-
22
-
23
-
24
-
25
-
26
-
27
-
28
-
29
-
30
-
31
-
32
-
33
-
34
-
35
-
36
-
37
-
38
-
39
-
40
-
41
-
42
-
43
-
44
-
45
-
46
-
47
-
48
-
49
-
50
-
51
-
52
-
53
-
54
-
55
-
56
-
57
-
58
-
59
-
60
 |
 |
