Arlo Pro 2 User Manual - Page 12
Test motion detection, Arm your camera to detect motion, Tips for optimal WiFi performance
 |
View all Arlo Pro 2 manuals
Add to My Manuals
Save this manual to your list of manuals |
Page 12 highlights
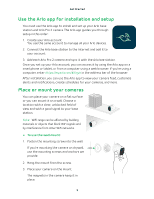
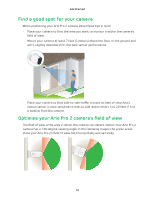
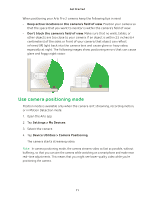
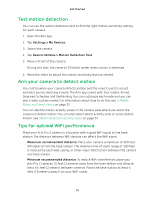
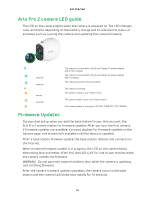
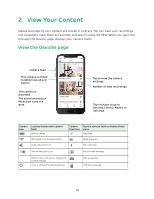
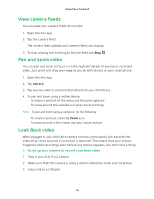
Get Started Test motion detection You can use the motion detection test to find the right motion sensitivity setting for each camera. 1. Open the Arlo app. 2. Tap Settings > My Devices. 3. Select the camera. 4. Tap Device Utilities > Motion Detection Test. 5. Move in front of the camera. During this test, the camera LED blinks amber when motion is detected. 6. Move the slider to adjust the motion sensitivity level as needed. Arm your camera to detect motion You control when your camera detects motion and the rules it uses to record and alert you by selecting a mode. The Arlo app comes with four modes: Armed, Disarmed, Schedule, and Geofending. You can customize each mode and you can also create custom modes. For information about how to do this, see 3. Modes, Rules, and Smart Alerts on page 22. You can identify motion activity zones in the camera view where you want the camera to detect motion. You can also select which activity zone or zones detect motion. See Motion detection activity zones on page 34. Tips for optimal WiFi performance Place your Arlo Pro 2 camera in a location with a good WiFi signal to the base station. The distance between WiFi devices can affect the WiFi signal: • Maximum recommended distance. Place your camera a maximum of 300 feet (90 meters) from the base station. The maximum line-of-sight range of 300 feet is reduced by each wall, ceiling, or other major obstruction between the camera and base station. • Minimum recommended distance. To reduce WiFi interference, place your Arlo Pro 2 cameras 10 feet (3 meters) away from the base station and allow at least 6½ feet (2 meters) between cameras. Place the base station at least 6 feet (1.8 meters) away from your WiFi router. 12
-
 1
1 -
2
-
3
-
4
-
5
-
6
-
 7
7 -
 8
8 -
 9
9 -
 10
10 -
 11
11 -
 12
12 -
 13
13 -
 14
14 -
 15
15 -
 16
16 -
 17
17 -
18
-
19
-
20
-
21
-
22
-
23
-
24
-
25
-
26
-
27
-
28
-
29
-
30
-
31
-
32
-
33
-
34
-
35
-
36
-
37
-
38
-
39
-
40
-
41
-
42
-
43
-
44
-
45
-
46
-
47
-
48
-
49
-
50
-
51
-
52
-
53
-
54
-
55
-
56
-
57
-
58
-
59
-
60
 |
 |