Asus T2-AH1 T2-AH1 English user manual E2065 - Page 13

Front panel I/O door. - windows 7

Page 13 highlights

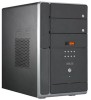
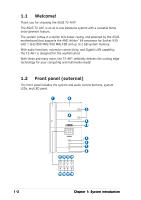
1 . F l o p p y d r i v e d o o r . Open this door to access the floppy disk drive. 2 . O p t i c a l d r i v e d o o r . This door opens when you eject the loading tray. 3 . E j e c t b u t t o n . Press this button to eject the optical drive loading tray. 4 . S e c o n d o p t i c a l d r i v e d o o r . This door covers a second optical drive bay. 5 . P o w e r b u t t o n . Press this button to turn the system on. 6 . P o w e r L E D . This LED lights up to indicate that the system is ON. 7 . H D D L E D . This LED lights up when data is being read from or written to the hard disk drive 8 . F r o n t p a n e l I / O d o o r . Open this door to show the front panel input/output ports. 9 . S t o r a g e c a r d r e a d e r d o o r. Open this door to access the 7-in-1 storage card reader. 1 0 . L E D p a n e l. The LED panel displays the audio medium (CD/FM), radio frequency, player status ( / ), real time clock, track number, and time. See page 1-10 for details. The following front panel buttons are activated only when the system is in A u d i o D J m o d e. The Audio DJ feature allows you to play CD audio tracks, or tune in to an FM radio station without entering the operating system. See page 3-12 for details. 1 1 . C D b u t t o n . Press this button to put the Audio DJ function to CD mode. In Windows® mode, pressing this button shuts down, restarts, or puts the system in sleep mode (S3) depending on the OS setting. 1 2 . M o d e b u t t o n . Press this button to switch from CD to FM radio mode or vice versa. 1 3 . P L A Y / P A U S E b u t t o n ( / ) . Press this button to perform various functions in different modes. In C D m o d e, plays or pauses an audio CD track. In R a d i o m o d e, scans the available FM stations when pressed for less than two seconds or presets a station when pressed for more than two seconds. Refer to page 3-13 on how to preset a radio station. ASUS T2-AH1 1-3

  • 1
  • 2
  • 3
  • 4
  • 5
  • 6
  • 7
  • 8
  • 9
  • 10
  • 11
  • 12
  • 13
  • 14
  • 15
  • 16
  • 17
  • 18
  • 19
  • 20
  • 21
  • 22
  • 23
  • 24
  • 25
  • 26
  • 27
  • 28
  • 29
  • 30
  • 31
  • 32
  • 33
  • 34
  • 35
  • 36
  • 37
  • 38
  • 39
  • 40
  • 41
  • 42
  • 43
  • 44
  • 45
  • 46
  • 47
  • 48
  • 49
  • 50
  • 51
  • 52
  • 53
  • 54
  • 55
  • 56
  • 57
  • 58
  • 59
  • 60
  • 61
  • 62
  • 63
  • 64
  • 65
  • 66
  • 67
  • 68
  • 69
  • 70
  • 71
  • 72
  • 73
  • 74
  • 75
  • 76
  • 77
  • 78
  • 79
  • 80
  • 81
  • 82
  • 83
  • 84
  • 85
  • 86
  • 87
  • 88
  • 89
  • 90
  • 91
  • 92
  • 93
  • 94
  • 95
  • 96
  • 97
  • 98
  • 99
  • 100
  • 101
  • 102
  • 103
  • 104
  • 105
  • 106
  • 107
  • 108
  • 109
  • 110
  • 111
  • 112
  • 113
  • 114
  • 115
  • 116
  • 117
  • 118
  • 119
  • 120
  • 121
  • 122

1-3
1-3
1-3
1-3
1-3
ASUS T2-AH1
ASUS T2-AH1
ASUS T2-AH1
ASUS T2-AH1
ASUS T2-AH1
1.
1.
1.
1.
1.
Floppy drive door.
Floppy drive door.
Floppy drive door.
Floppy drive door.
Floppy drive door. Open this door to access the floppy disk drive.
2.
2.
2.
2.
2.
Optical drive door.
Optical drive door.
Optical drive door.
Optical drive door.
Optical drive door. This door opens when you eject the loading
tray.
3.
3.
3.
3.
3.
Eject button.
Eject button.
Eject button.
Eject button.
Eject button. Press this button to eject the optical drive loading
tray.
4.
4.
4.
4.
4.
Second optical drive door.
Second optical drive door. This door covers a second optical
drive bay.
5.
5.
5.
5.
5.
Power button
Power button
Power button
Power button
Power button
.
.
.
.
. Press this button to turn the system on.
6.
6.
6.
6.
6.
Power LED
Power LED
Power LED
Power LED
Power LED
.
.
.
.
. This LED lights up to indicate that the system is ON.
7.
7.
7.
7.
7.
HDD LED
HDD LED
HDD LED
HDD LED
HDD LED
.
.
.
.
. This LED lights up when data is being read from or
written to the hard disk drive
8.
8.
8.
8.
8.
Front panel I/O door.
Front panel I/O door. Open this door to show the front panel
input/output ports.
9.
9.
9.
9.
9.
Storage card reader door
.
Open this door to access the 7-in-1
storage card reader.
10.
10.
10.
10.
10. LED panel
LED panel
LED panel
LED panel
LED panel
.
The LED panel displays the audio medium (CD/FM), radio
frequency, player status (
/
), real time clock, track number, and
time. See page 1-10 for details.
The following front panel buttons are activated only when the system is
in Audio DJ mode
Audio DJ mode
Audio DJ mode
Audio DJ mode
Audio DJ mode. The Audio DJ feature allows you to play CD audio
tracks, or tune in to an FM radio station without entering the operating
system. See page 3-12 for details.
11.
11.
11.
11.
11. CD button
CD button
CD button
CD button
CD button
.
.
.
.
. Press this button to put the Audio DJ function to CD
mode.
In Windows
®
mode, pressing this button shuts down, restarts, or puts
the system in sleep mode (S3) depending on the OS setting.
12.
12.
12.
12.
12. Mode button.
Mode button.
Mode button.
Mode button.
Mode button. Press this button to switch from CD to FM radio
mode or vice versa.
13.
13.
13.
13.
13. PLAY/PAUSE button (
PLAY/PAUSE button (
PLAY/PAUSE button (
PLAY/PAUSE button (
PLAY/PAUSE button (
/
).
).
).
).
). Press this button to perform various
functions in different modes.
In CD mode
CD mode
CD mode
CD mode
CD mode, plays or pauses an audio CD track.
In Radio mode
Radio mode
Radio mode
Radio mode
Radio mode, scans the available FM stations when pressed for
less than two seconds or presets a station when pressed for more
than two seconds. Refer to page 3-13 on how to preset a radio
station.