Asus T2-AH1 T2-AH1 English user manual E2065 - Page 28
Removing the CPU fan and heatsink assembly
 |
View all Asus T2-AH1 manuals
Add to My Manuals
Save this manual to your list of manuals |
Page 28 highlights
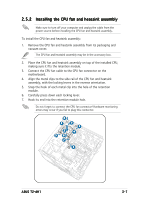
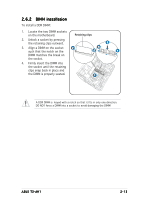
2.5.3 Removing the CPU fan and heatsink assembly Make sure to turn off your computer and unplug the cable from the power source before removing the CPU fan and heatsink assembly. To remove the CPU fan and heatsink assembly: 1. Disconnect the CPU fan cable from the CPU fan connector on the motherboard. 2. Carefully press down the locking lever. 3. Unhook the end of the locking lever from the retention module hole. 4. Slide out the metal clip to remove the hook of the other locking lever end from the retention module hole. 5. Lift the metal clip from the side rail of the CPU fan and heatsink assembly. 6. Repeat steps 2 ~ 5 to remove the other metal clip. 7. Carefully lift the CPU fan and heatsink assembly. 7 4 5 2 3 1 2-8 Chapter 2: Basic installation
-
 1
1 -
2
-
3
-
4
-
5
-
6
-
7
-
8
-
9
-
10
-
11
-
12
-
13
-
14
-
15
-
16
-
17
-
18
-
19
-
20
-
21
-
22
-
 23
23 -
 24
24 -
 25
25 -
 26
26 -
 27
27 -
 28
28 -
 29
29 -
 30
30 -
 31
31 -
 32
32 -
 33
33 -
34
-
35
-
36
-
37
-
38
-
39
-
40
-
41
-
42
-
43
-
44
-
45
-
46
-
47
-
48
-
49
-
50
-
51
-
52
-
53
-
54
-
55
-
56
-
57
-
58
-
59
-
60
-
61
-
62
-
63
-
64
-
65
-
66
-
67
-
68
-
69
-
70
-
71
-
72
-
73
-
74
-
75
-
76
-
77
-
78
-
79
-
80
-
81
-
82
-
83
-
84
-
85
-
86
-
87
-
88
-
89
-
90
-
91
-
92
-
93
-
94
-
95
-
96
-
97
-
98
-
99
-
100
-
101
-
102
-
103
-
104
-
105
-
106
-
107
-
108
-
109
-
110
-
111
-
112
-
113
-
114
-
115
-
116
-
117
-
118
-
119
-
120
-
121
-
122
 |
 |
