Asus T2-AH1 T2-AH1 English user manual E2065 - Page 18
Audio ports function variation
 |
View all Asus T2-AH1 manuals
Add to My Manuals
Save this manual to your list of manuals |
Page 18 highlights
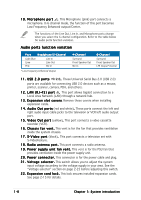
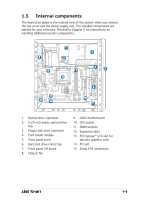
1 0 . M i c r o p h o n e p o r t . This Microphone (pink) port connects a microphone. In 6-channel mode, the function of this port becomes Low Frequency Enhanced output/Center. The functions of the Line Out, Line In, and Microphone ports change when you select the 6-channel configuration. Refer to the table below for audio ports function variation. Audio ports function variation Port Headphone/2-Channel Light Blue Lime Pink Line In Line Out Mic In * Low Frequency Enhanced Output 4-Channel Surround Front Speaker Out Mic In 6-Channel Surround Front Speaker Out LFE Output*/Center 1 1 . U S B 2 . 0 p o r t s 2.0. These Universal Serial Bus 2.0 (USB 2.0) ports are available for connecting USB 2.0 devices such as a mouse, printer, scanner, camera, PDA, and others. 1 2 . L A N ( R J - 4 5 ) p o r t . This port allows Gigabit connection to a Local Area Network (LAN) through a network hub. 1 3 . E x p a n s i o n s l o t c o v e r s. Remove these covers when installing expansion cards. 1 4 . A u d i o O u t p o r t s (red and white). These ports connect the left and right audio input cable jacks to the television or VCR left audio output port. 1 5 . V i d e o O u t p o r t (yellow). This port connects a video cassette recorder (VCR). 1 6 . C h a s s i s f a n v e n t . This vent is for the fan that provides ventilation inside the system chassis. 1 7 . S - V i d e o p o r t (black). This port connects a television set with S-Videofeature. 1 8 . R a d i o a n t e n n a p o r t . This port connects a radio antenna. 1 9 . P o w e r s u p p l y u n i t f a n v e n t . This vent is for the PSU fan that provides ventilation inside the power supply unit. 2 0 . P o w e r c o n n e c t o r . This connector is for the power cable and plug. 2 1 . V o l t a g e s e l e c t o r . This switch allows you to adjust the system input voltage according to the voltage supply in your area. See the "Voltage selector" section on page 2-25 before adjusting this switch. 2 2 . E x p a n s i o n c a r d l o c k . This lock secures installed expansion cards. See page 2-15 for details. 1-8 Chapter 1: System introduction
-
 1
1 -
2
-
3
-
4
-
5
-
6
-
7
-
8
-
9
-
10
-
11
-
12
-
 13
13 -
 14
14 -
 15
15 -
 16
16 -
 17
17 -
 18
18 -
 19
19 -
 20
20 -
 21
21 -
 22
22 -
 23
23 -
24
-
25
-
26
-
27
-
28
-
29
-
30
-
31
-
32
-
33
-
34
-
35
-
36
-
37
-
38
-
39
-
40
-
41
-
42
-
43
-
44
-
45
-
46
-
47
-
48
-
49
-
50
-
51
-
52
-
53
-
54
-
55
-
56
-
57
-
58
-
59
-
60
-
61
-
62
-
63
-
64
-
65
-
66
-
67
-
68
-
69
-
70
-
71
-
72
-
73
-
74
-
75
-
76
-
77
-
78
-
79
-
80
-
81
-
82
-
83
-
84
-
85
-
86
-
87
-
88
-
89
-
90
-
91
-
92
-
93
-
94
-
95
-
96
-
97
-
98
-
99
-
100
-
101
-
102
-
103
-
104
-
105
-
106
-
107
-
108
-
109
-
110
-
111
-
112
-
113
-
114
-
115
-
116
-
117
-
118
-
119
-
120
-
121
-
122
 |
 |
