Brother International ™ QL-1050 Users Manual - English and Spanish - Page 16
Attaching the Label Tray, Using the Interface Cable
 |
View all Brother International ™ QL-1050 manuals
Add to My Manuals
Save this manual to your list of manuals |
Page 16 highlights
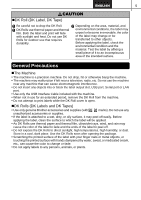
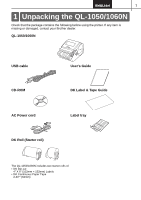
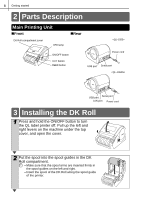
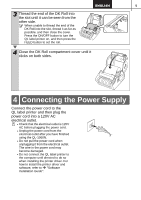
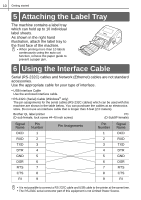
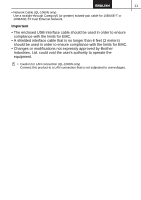
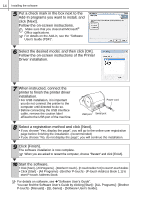
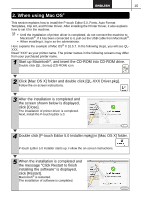
10 Getting started 5 Attaching the Label Tray The machine contains a label tray which can hold up to 10 individual label sheets. As shown in the right hand illustration, attach the label tray to the front face of the machine. • When printing more than 10 labels continuously using the auto cut function, remove the paper guide to prevent a paper jam. 6 Using the Interface Cable Serial (RS-232C) cables and Network (Ethernet) cables are not standard accessories. Use the appropriate cable for your type of interface. • USB Interface Cable Use the enclosed interface cable. • RS-232C (Serial) Cable (Windows® only) The pin assignments for the serial cables (RS-232C cables) which can be used with this machine are shown in the table below. You can purchase the cables at an electronics store. Do not use an interface cable that is longer than 6 feet (2.0 meters). Brother QL label printer (D-sub female, lock screw #4-40 inch screw) PC (D-Sub9P female) Signal Name DCD RXD TXD DTR GND DSR RTS CTS RI Pin Number 1 2 3 4 5 6 7 8 9 Pin Assignments Pin Number 1 2 3 4 5 6 7 8 9 Signal Name DCD RXD TXD DTR GND DSR RTS CTS RI • It is not possible to connect a RS-232C cable and USB cable to the printer at the same time. • The RS-232C serial connector part of this equipment is not Limited Power Source.
-
 1
1 -
2
-
3
-
4
-
5
-
6
-
7
-
8
-
9
-
10
-
 11
11 -
 12
12 -
 13
13 -
 14
14 -
 15
15 -
 16
16 -
 17
17 -
 18
18 -
 19
19 -
 20
20 -
 21
21 -
22
-
23
-
24
-
25
-
26
-
27
-
28
-
29
-
30
-
31
-
32
-
33
-
34
-
35
-
36
-
37
-
38
-
39
-
40
-
41
-
42
-
43
-
44
-
45
-
46
-
47
-
48
-
49
-
50
-
51
-
52
-
53
-
54
-
55
-
56
-
57
-
58
-
59
-
60
-
61
-
62
-
63
-
64
-
65
-
66
-
67
-
68
-
69
-
70
-
71
-
72
-
73
-
74
-
75
-
76
-
77
-
78
-
79
-
80
-
81
-
82
-
83
-
84
-
85
-
86
-
87
-
88
-
89
 |
 |
