Brother International ™ QL-1050 Users Manual - English and Spanish - Page 22
Printer Setup Utility]., For Mac OS
 |
View all Brother International ™ QL-1050 manuals
Add to My Manuals
Save this manual to your list of manuals |
Page 22 highlights
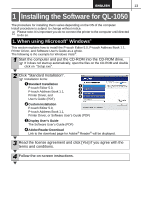
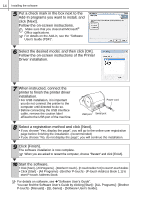
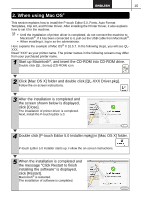
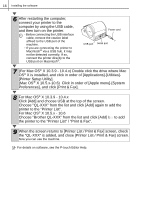
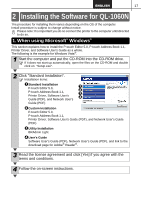
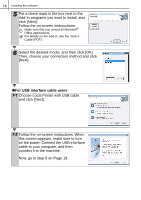
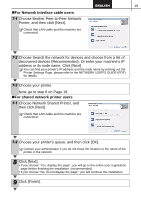
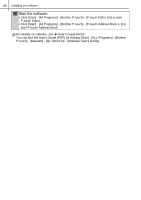
16 Installing the software 6 After restarting the computer, connect your printer to the computer by using the USB cable, and then turn on the printer. · Before connecting the USB interface cable, remove the caution label affixed to the USB port of the machine. · If you are connecting the printer to Macintosh® via a USB hub, it may not be detected correctly. If so, connect the printer directly to the USB port on Macintosh®. Power cord USB port Serial port 7 (For Mac OS® X 10.3.9 - 10.4.x) Double click the drive where Mac OS® X is installed, and click in order of [Applications]-[Utilities][Printer Setup Utility]. (Mac OS® X 10.5.x-10.6) Click in order of [Apple menu]-[System Preferences], and click [Print & Fax]. 8 For Mac OS® X 10.3.9 - 10.4.x Click [Add] and choose USB at the top of the screen. Choose "QL-XXX" from the list and click [Add] again to add the printer to the "Printer List". For Mac OS® X 10.5.x - 10.6 Choose "Brother QL-XXX" from the list and click [Add] / to add the printer to the "Printer List" / "Print & Fax". 9 When the screen returns to [Printer List / Print & Fax] screen, check the "QL-XXX" is added, and close [Printer List / Print & Fax] screen. Now you can use the machine. For details on software, see the P-touch Editor Help.
-
 1
1 -
2
-
3
-
4
-
5
-
6
-
7
-
8
-
9
-
10
-
11
-
12
-
13
-
14
-
15
-
16
-
 17
17 -
 18
18 -
 19
19 -
 20
20 -
 21
21 -
 22
22 -
 23
23 -
 24
24 -
 25
25 -
 26
26 -
 27
27 -
28
-
29
-
30
-
31
-
32
-
33
-
34
-
35
-
36
-
37
-
38
-
39
-
40
-
41
-
42
-
43
-
44
-
45
-
46
-
47
-
48
-
49
-
50
-
51
-
52
-
53
-
54
-
55
-
56
-
57
-
58
-
59
-
60
-
61
-
62
-
63
-
64
-
65
-
66
-
67
-
68
-
69
-
70
-
71
-
72
-
73
-
74
-
75
-
76
-
77
-
78
-
79
-
80
-
81
-
82
-
83
-
84
-
85
-
86
-
87
-
88
-
89
 |
 |
