Brother International ™ QL-1050 Users Manual - English and Spanish - Page 29
When using Mac OS®, Open [Brother OL-XXX Driver] in [Mac OS X] folder.
 |
View all Brother International ™ QL-1050 manuals
Add to My Manuals
Save this manual to your list of manuals |
Page 29 highlights
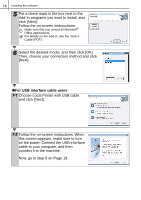
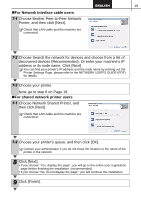
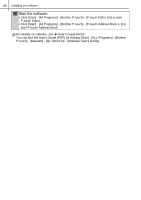
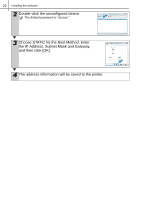
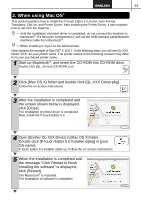
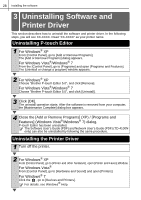
23 2. When using Mac OS® This section explains how to install the P-touch Editor 5.0, Fonts, Auto Format Templates, Clip Art, and Printer Driver. After installing the Printer Driver, it also explains how to set it for the machine. • Until the installation of printer driver is completed, do not connect the machine to Macintosh®. If it has been connected to it, pull out the USB interface cable/Network interface cable from Macintosh®. • When installing it, log in as the administrator. Here explains the example of Mac OS® X 10.5.7. In the following steps, you will see QL-XXX. Read "XXX" as your printer name. The printer names in the following screens may differ from your purchased printer name. 1 Start up Macintosh®, and insert the CD-ROM into CD-ROM drive. Double click [QL_Series] (CD-ROM) icon. 2 Click [Mac OS X] folder and double click [QL-XXX Driver.pkg]. Follow the on-screen instructions. 3 After the installation is completed and the screen shown below is displayed, click [Close]. The installation of printer driver is completed. Next, install the P-touch Editor 5.0. 4 Open [Brother OL-XXX Driver] in [Mac OS X] folder. Double click [P-touch Editor 5.0 Installer.mpkg] in [your OS name]. P-touch Editor 5.0 Installer starts up. Follow the on-screen instructions. 5 When the installation is completed and the message "Click Restart to finish installing the software" is displayed, click [Restart]. The Macintosh® is restarted. The installation of software is completed.
-
 1
1 -
2
-
3
-
4
-
5
-
6
-
7
-
8
-
9
-
10
-
11
-
12
-
13
-
14
-
15
-
16
-
17
-
18
-
19
-
20
-
21
-
22
-
23
-
 24
24 -
 25
25 -
 26
26 -
 27
27 -
 28
28 -
 29
29 -
 30
30 -
 31
31 -
 32
32 -
 33
33 -
 34
34 -
35
-
36
-
37
-
38
-
39
-
40
-
41
-
42
-
43
-
44
-
45
-
46
-
47
-
48
-
49
-
50
-
51
-
52
-
53
-
54
-
55
-
56
-
57
-
58
-
59
-
60
-
61
-
62
-
63
-
64
-
65
-
66
-
67
-
68
-
69
-
70
-
71
-
72
-
73
-
74
-
75
-
76
-
77
-
78
-
79
-
80
-
81
-
82
-
83
-
84
-
85
-
86
-
87
-
88
-
89
 |
 |
