Brother International ™ QL-1050 Users Manual - English and Spanish - Page 30
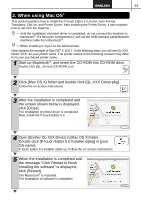
X 10.4.x - 10.6 Click Add, Press ON/OFF button
 |
View all Brother International ™ QL-1050 manuals
Add to My Manuals
Save this manual to your list of manuals |
Page 30 highlights
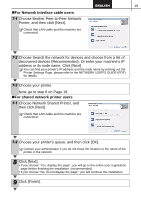
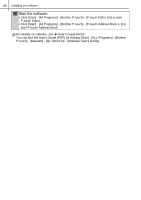
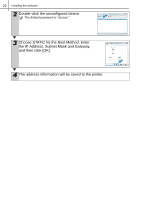
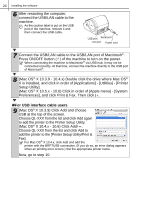
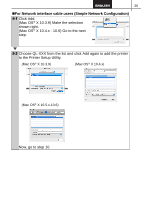
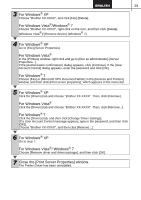
24 Installing the software 6 After restarting the computer, connect the USB/LAN cable to the machine. As the caution label is put on the USB port of the machine, remove it and then connect the USB cable. USB port Serial port LAN port Power cord 7 Connect the USB/LAN cable to the USB/LAN port of Macintosh®. Press ON/OFF button ( ) of the machine to turn on the power. When connecting the machine to Macintosh® via USB hub, it may not be connected correctly. At that time, connect the machine directly to the USB port of Macintosh®. 8 (Mac OS® X 10.3.9 - 10.4.x) Double click the drive where Mac OS® X is installed, and click in order of [Applications] - [Utilities] - [Printer Setup Utility]. (Mac OS® X 10.5.x - 10.6) Click in order of [Apple menu] - [System Preferences], and click Print & Fax. Then click . „For USB interface cable users 9 (Mac OS® X 10.3.9) Click Add and choose USB at the top of the screen. Choose QL-XXX from the list and click Add again to add the printer to the Printer Setup Utility. (Mac OS® X 10.4.x - 10.6) Click Add/ . Choose QL-XXX from the list and click Add to add the printer to the [Printer Setup Utility/Print & Fax]. For Mac OS® X 10.4.x, click Add and add the printer with the BRPTUSB connection. (If you do so, an error dialog appears when an printing error occurs.) Set the appropriate printer name. Now, go to step 10.
-
 1
1 -
2
-
3
-
4
-
5
-
6
-
7
-
8
-
9
-
10
-
11
-
12
-
13
-
14
-
15
-
16
-
17
-
18
-
19
-
20
-
21
-
22
-
23
-
24
-
 25
25 -
 26
26 -
 27
27 -
 28
28 -
 29
29 -
 30
30 -
 31
31 -
 32
32 -
 33
33 -
 34
34 -
 35
35 -
36
-
37
-
38
-
39
-
40
-
41
-
42
-
43
-
44
-
45
-
46
-
47
-
48
-
49
-
50
-
51
-
52
-
53
-
54
-
55
-
56
-
57
-
58
-
59
-
60
-
61
-
62
-
63
-
64
-
65
-
66
-
67
-
68
-
69
-
70
-
71
-
72
-
73
-
74
-
75
-
76
-
77
-
78
-
79
-
80
-
81
-
82
-
83
-
84
-
85
-
86
-
87
-
88
-
89
 |
 |
