Brother International ™ QL-1050 Users Manual - English and Spanish - Page 24
For USB interface cable users, Choose Local Printer with USB cable
 |
View all Brother International ™ QL-1050 manuals
Add to My Manuals
Save this manual to your list of manuals |
Page 24 highlights
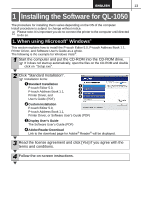
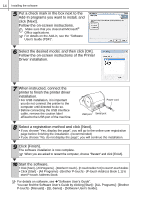
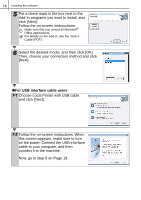
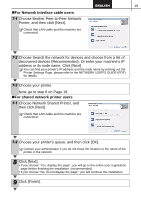
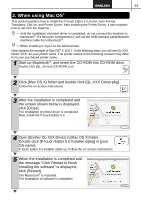
18 Installing the software 5 Put a check mark in the box next to the Add-In programs you want to install, and click [Next]. Follow the on-screen instuructions. Make sure that you closed all Microsoft® Office applications. For details on the Add-in, see the "User's Guide (PDF)". 6 Select the desired model, and then click [OK]. Then, choose your connection method and click [Next]. „For USB interface cable users 7-1 Choose Local Printer with USB cable and click [Next]. 7-2 Follow the on-screen instructions. When this screen appears, make sure to turn on the power. Connect the USB interface cable to your computer, and then connect it to the machine. Now, go to step 8 on Page 19.
-
 1
1 -
2
-
3
-
4
-
5
-
6
-
7
-
8
-
9
-
10
-
11
-
12
-
13
-
14
-
15
-
16
-
17
-
18
-
 19
19 -
 20
20 -
 21
21 -
 22
22 -
 23
23 -
 24
24 -
 25
25 -
 26
26 -
 27
27 -
 28
28 -
 29
29 -
30
-
31
-
32
-
33
-
34
-
35
-
36
-
37
-
38
-
39
-
40
-
41
-
42
-
43
-
44
-
45
-
46
-
47
-
48
-
49
-
50
-
51
-
52
-
53
-
54
-
55
-
56
-
57
-
58
-
59
-
60
-
61
-
62
-
63
-
64
-
65
-
66
-
67
-
68
-
69
-
70
-
71
-
72
-
73
-
74
-
75
-
76
-
77
-
78
-
79
-
80
-
81
-
82
-
83
-
84
-
85
-
86
-
87
-
88
-
89
 |
 |

Installing the software
18
5
Put a check mark in the box next to the
Add-In programs you want to install, and
click [Next].
Follow the on-screen instuructions.
Make sure that you closed all Microsoft
®
Office applications.
For details on the Add-in, see the "User's
Guide (PDF)".
6
Select the desired model, and then click [OK].
Then, choose your connection method and click
[Next].
For USB interface cable users
7-1
Choose Local Printer with USB cable
and click [Next].
7-2
Follow the on-screen instructions. When
this screen appears, make sure to turn
on the power. Connect the USB interface
cable to your computer, and then
connect it to the machine.
Now, go to step 8 on Page 19.