Brother International BAS-300 Series Programmer Instruction Manual - English - Page 10
MN MEj
 |
View all Brother International BAS-300 Series manuals
Add to My Manuals
Save this manual to your list of manuals |
Page 10 highlights
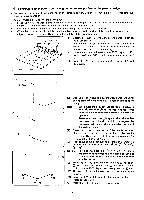
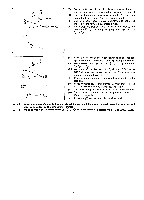
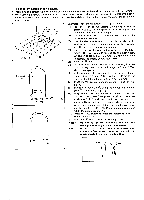
O O Any desired point gi •"789"-R (9) Press the M key. (If the stitch length is to be changed, specify the new stitch length before pressing the N) key.) (10) Use the direction keys to move to points © , and then press the key. Point © is now programmed. (11) Use the direction keys to move to point ®, and then press the key. Point ® is now programmed. (12) As in step (8), display "789" in the STEP display, and g press the key. This completes programming of interval (13) Press the Ei key. (if the stitch length is to be changed, specify the new stitch length before pressing the key.) (14) Use the direction keys and the [I) key to program points 0, @ and ®. (15) As in step (8), at the last point 0 display "789" in the STEP display, and press the El key. This completes OD progamming of interval ® - 0. Programming can also be continued from point @ after step (15). (16) Press numeral key M three times. Confirm that "111" is in the STEP display, and then press the Ej key. , (17) The work clamp will return to the initial stitch position. (18) Press the RAN switch to write the pattern to disk. "789" • • "111"• (Refer to page 24.) Press the [1) key to enter the sewing mode. Note 1 Note 2 At corners such as © and 0, be sure to break the pattern. If the pattern is not broken, these corners will also be rounded by the smoothing function. ©, e, ©, Using as many intermediate points (8, 8 in the figure) as possible will provide better results.
-
 1
1 -
2
-
3
-
4
-
 5
5 -
 6
6 -
 7
7 -
 8
8 -
 9
9 -
 10
10 -
 11
11 -
 12
12 -
 13
13 -
 14
14 -
 15
15 -
16
-
17
-
18
-
19
-
20
-
21
-
22
-
23
-
24
-
25
-
26
-
27
-
28
-
29
-
30
-
31
-
32
-
33
-
34
-
35
-
36
 |
 |
