Brother International BAS-300 Series Programmer Instruction Manual - English - Page 28
revise, stitch, pattern, program, points, according, alterations, design
 |
View all Brother International BAS-300 Series manuals
Add to My Manuals
Save this manual to your list of manuals |
Page 28 highlights
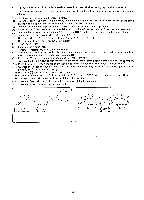
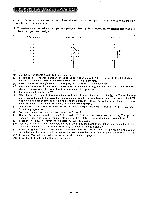
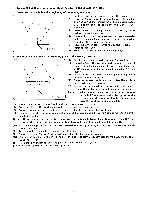
HOW TO REVISE THE PROGRAM ) • Use the key to revise a program according to alterations made in the pattern design or to correct a program which was input incorrectly. El To revise a section of a stitch pattern program from points according to alterations made in the stitch pattern design Before revision Interposed stitches After revision 4 5 • 5 6 • 6 •\ 7 • 7 • 8 • 8 • (1) Set the power source switch to the ON position. (2) Press the E key. The work clamp will move to the point of origin (X-0; Y-0), the numeral "0" will be indicated on the STEP display, and the command indicator "F" will illuminate. (3) Insert the disk containing the stitch pattern program to perform the read operation. y (4) Press the numeral key 3 times to indicate "999" on the STEP display, and then,.press the (11 key. The work clamp will move one stitch at a time from the initial stitch position. Maximum stitch number is 999. (5) When the tip of the needle becomes aligned with point 4, press either the or the 11] key. The work clamp movement will stop. (If, however, the work clamp is accidentally moved beyond point 4, indicate on the STEP display the number of stitches past point 4, and then press the H key. The work clamp will move as many times as indicated on the STEP display in the reverse direction.) (6) Operate the direction keys to align the tip of the needle with point 5', and then press the 11 key. Thus, point 5' will be programmed. (7) Follow the above procedure to program points 6' and 7'. (8) Operate the numeral keys to indicate "001" on the STEP display, and then press the E] key. The tip of the needle will move to point 5. Thus, points 5', 6' and 7' will be interposed between points 4 and 5. (9) Press the M key. The command indicator "C" will illuminate. (10) Operate the numeral keys to indicate on the STEP display the number of stitches to be cancelled. (In this instance, indicate "003" on the STEP display to cancel points 5, 6 and 7.) (11) Press the (I) key. The tip of the needle will move to points 6, 7 and 8. Thus, the 3 points 5, 6 and 7 will be cancelled and the program will be revised so that the needle will move from point 4 -. 5' - 6' - 7'- 8. (12) Press the R/W switch to write the pattern to disk. (Refer to page 24.) (13) Press the El Ice r to enter the sewing mode.
-
 1
1 -
2
-
3
-
4
-
5
-
6
-
7
-
8
-
9
-
10
-
11
-
12
-
13
-
14
-
15
-
16
-
17
-
18
-
19
-
20
-
21
-
22
-
 23
23 -
 24
24 -
 25
25 -
 26
26 -
 27
27 -
 28
28 -
 29
29 -
 30
30 -
 31
31 -
 32
32 -
 33
33 -
34
-
35
-
36
 |
 |
