Brother International BAS-300 Series Programmer Instruction Manual - English - Page 11
program, double, stitch, patterns
 |
View all Brother International BAS-300 Series manuals
Add to My Manuals
Save this manual to your list of manuals |
Page 11 highlights
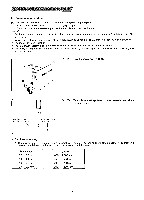
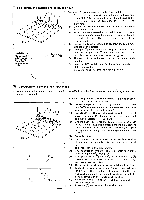
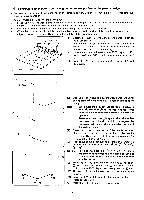
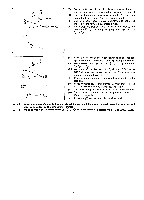
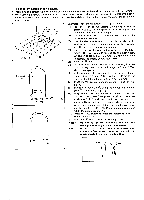
To program double stitch patterns • Programming a pattern with two seams at a constant width apart can be easily accomplished with smoothing. • When sewing a double seam pattern as shown below, the second seam will be sewn to the left of the base (main) pattern line. It is therefore necessary to consider and determine the base line of the pattern to obtain the desired effect. Example: Program the pattern in the figure at left. (1) Press theE key. The work clamp will move to the point of origin (X-0; Y-0), "0" will appear in the STEP display, and command indicator "F" will light. (2) Use the direction keys to move the work clamp to the initial stitch position. (3) Use the direciton keys to position the needle at the sewing start position 0 on the pattern, and then press ID key. The first stitch is now programmed. (4) Use the numerical keypad to display "2OO" in the STEP display. The last two digits entered are the stitch width, (X-0, Y-0) which can be set from 2 - 9.8 mm. If a 3 mm stitch width is desired, the display should read "230". (5) Press the 1 key. (6) Use the numeral keys to enter the stitch length in the STEP display. (e.g., If the stitch length is 3 mm, "030" should be displayed.) If the stitch length is not specified, or if a stitch length Stitch width 3 mm greater than 8.0 mm ("080" in the STEP display) is entered, it will be automatically be reset to 2 mm. (7) Press the n key. Command indicators "F" and "M" will be on. (8) Program to point the 0 using the smoothing function. I At Sewing of direction O El• "230" •N • "030" •[] ..789,..©...111" (See [1] Smoothing, page 7.) (9) At 0, enter "789" in the STEP display with the keypad, and press the [11 key. Then press the [11 key three times g to display "111", and press the key. An electronic alarm will beep, indicating the pattern is being processed. After processing is completed, the needle will move slowly from 0 - © - 0. Programming is completed when the needle reaches 0. (10) Press the R/W switch to write the pattern to disk. (Refer to page 24.) Press the E key to enter the sewing mode. Note 1 Be sure to use the smoothing function alone when programming double stitch patterns. Note 2 If the base pattern contains extremely short corners or fine curves, it may not be possible to obtain the desired double stitch pattern. •• ® 0 • / •
-
 1
1 -
2
-
3
-
4
-
5
-
 6
6 -
 7
7 -
 8
8 -
 9
9 -
 10
10 -
 11
11 -
 12
12 -
 13
13 -
 14
14 -
 15
15 -
 16
16 -
17
-
18
-
19
-
20
-
21
-
22
-
23
-
24
-
25
-
26
-
27
-
28
-
29
-
30
-
31
-
32
-
33
-
34
-
35
-
36
 |
 |
