Brother International BAS-300 Series Programmer Instruction Manual - English - Page 22
Brother International BAS-300 Series Manual
 |
View all Brother International BAS-300 Series manuals
Add to My Manuals
Save this manual to your list of manuals |
Page 22 highlights
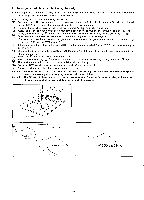
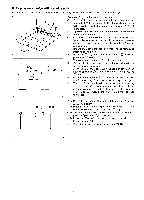
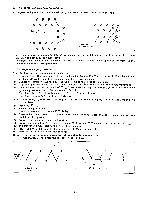
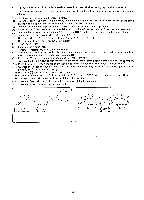
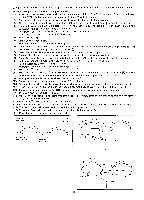
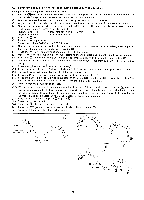
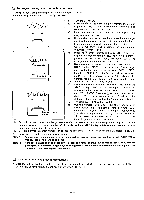
is To program a zigzag sewing operation • A zigzag sewing operation can be easily programmed by employing the tracing method. R R R A Direction of tracing operation A R, Direction of tracing operation In the zigzag sewing operation, patterns will appear only to the left side on the direction of the tracing operation as shown in the figure above. Therefore, it is necessary to establish the proper direction of the tracing operation according to the requirements of the sewing,material. A. To program a zigzag operation. Example: Program the pattern in the figures below. (1) Press the E key. The work clamp will move to the point of origin (X-0; Y-0), the numeral "0" will be indicated on the STEP display, and the command indicator "F" will illuminate. (2) Operate the direction keys to move the work clamp to the initial stitch position. (3) Align the tip of the needle with the initial stitch position 0 on the outline of the needle movement. (4) Operate the numeral keys to indicate "77 " on the STEP display. The last digit .is the numeral obtained by dividing the stitch width (Q) by the pitch (P) - 1. Therefore, (Q) (P) - 1. In this instance, 3 mm ± 3 mm - 1 = 0. Therefore, indicate "770" on the STEP display. Note Set the zigzag width and stitch length so that areas corresponding to ( )number 0 to 9 are positive numbers. g (5) Press the key. (6) Establish the proper pitch. Therefore, indicate "030" on the STEP display. (7) Operate the direction keys so that the tip of the needle accurately traces the pattern design, starting from the initial stitch position O. (8) Press the key at the final stitch position. (9) Press the numeral key C) 3 times to indicate "111" on the STEP display. Then, press the (I) key. (10) The presser will move back to the initial stitch position. (11) Press the R/W switch to write the pattern to disk. (Refer to page 24.) Press the EJ key to enter the sewing mode. Note The E1 key is to be pressed, only at procedure 5 mentioned above. Otherwise, do not press the key or the Ej key. Zigzag width (2) 3 mm (P) Stitch length 3 mm 2 = 3 mm P = 3 mm A // \ \/ V V V Tracing operation 0 "77 !ff. '030" Final stitch • "111" • O
-
 1
1 -
2
-
3
-
4
-
5
-
6
-
7
-
8
-
9
-
10
-
11
-
12
-
13
-
14
-
15
-
16
-
 17
17 -
 18
18 -
 19
19 -
 20
20 -
 21
21 -
 22
22 -
 23
23 -
 24
24 -
 25
25 -
 26
26 -
 27
27 -
28
-
29
-
30
-
31
-
32
-
33
-
34
-
35
-
36
 |
 |
