Brother International BAS-300 Series Programmer Instruction Manual - English - Page 7
©key.
 |
View all Brother International BAS-300 Series manuals
Add to My Manuals
Save this manual to your list of manuals |
Page 7 highlights
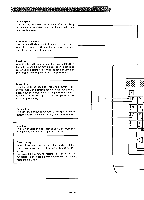
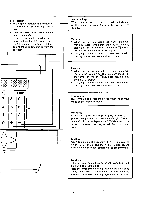
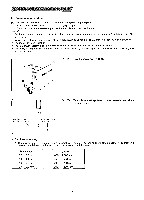
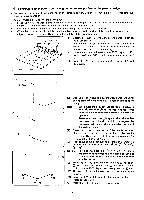
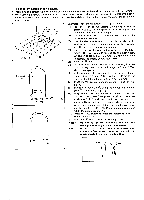
0 To program the pattern one stitch at a time (X-0, Y-0) Initial stitch 'Marking eact. stitch position • on the patter • will make programming easier. Final stitch a - 111- X Example: Program the pattern in the figure at left. (1) Press the t] key. The work clamp will move to the point of origin (X-0; Y-0), the numeral "0" will be indicated on the STEP display, and the command indicator "F" will illuminate. (2) Operate the direction keys to move the work clamp to the initial stitch position. (3) When the tip of the needle and the initial stitch position on the outline of the needle movement become aligned, g press the key. Thus, the initial stitch will be programmed. (4) Repeat the above procedure to program the remaining stitches of the pattern. (5) After the Cl key is pressed to program the final stitch, press the numeral key 3 times to indicate "111" on the STEP display, and then press the (11 key. (6) The work clamp will move back to the initial stitch position. (7) Press the R/W switch to write the pattern to disk. (Refer to page 24.) Press the key to enter the sewing mode. To program with the enlarged input mode • Programming a fine pattern stitch by stitch is simplified by enlarging the pattern and entering it with the enlarged input mode. Example: Program the pattern below with a 5-times enlarge- ment of the actual pattern. (1) Prepare the pattern used for programming. (This should be a 5OO% enlargement (based on the center point of the work clamp) of the actual pattern.) (2) Press the ©key. The work clamp will move to the point of origin (X-0; Y-0), "0" will appear in the STEP display, and command indicator "F" will light. (3) Use the numerical keypad to display 9 OD in the STEP display. The last two digits entered are the enlargement ratio, which can be set for 2, 5, or 10 times. As a 5-times enlargement is being used, the display should read "9O5". (X-0, Y-0) (4) Press the 1 key. (5) Use the direction keys to position the needle at sewing start position the Q on the pattrn, and then press the key. The first stitch is now programmed. g (6) Use the direction keys and key to program each of the successive points 0 through 0 . g g (7) After pressing the key at 0, press numeral key 1 three times. Confirm that "111" is in the STEP display, and then press the [I) key. (8) The work clamp will return to the initial stitch position. To check the program, press key Ethree times to display "999" in the STEP display, and then press the (I) key. ,(X90-05yj••-Eoi) The work clamp will move stitch by stitch through the pattern starting at the initial stitch position. og O© g (9) Press the R/W switch to write the pattern to disk. (Refer to page 24.) Press the El key to enter the sewing mode.. -5-
-
 1
1 -
 2
2 -
 3
3 -
 4
4 -
 5
5 -
 6
6 -
 7
7 -
 8
8 -
 9
9 -
 10
10 -
 11
11 -
 12
12 -
13
-
14
-
15
-
16
-
17
-
18
-
19
-
20
-
21
-
22
-
23
-
24
-
25
-
26
-
27
-
28
-
29
-
30
-
31
-
32
-
33
-
34
-
35
-
36
 |
 |
