Brother International BAS-300 Series Programmer Instruction Manual - English - Page 13
program, basting, stitch, ETIK.
 |
View all Brother International BAS-300 Series manuals
Add to My Manuals
Save this manual to your list of manuals |
Page 13 highlights
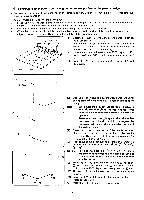
El To program a basting stitch • Basting stitches can be easily programmed using the feed stitch mode. (X-0, Y-O) Example: Program the pattern 'in the figure at left. (1) Press the ©key. The work clamp will move to the point of origin (X-0; Y-0), "0" will appear in the STEP display, and command indicator "F" will light. (2) Use the direction keys to move the work clamp to the initial stitch position. (3) Use the direction keys to position the needle at the sewing start position ® on the pattern, and then pess the g key. The first stitch is now programmed. g (4) Use the direction keys and key to program stitch by stitch to ® and 0. (Refer to page 5.) g (5) At ®, press the key three times to display "999" in the STEP display, and then press the n key. 0R E•"999"• © 0 QE l] • "999"• © cc ETIK.-111".(11 Points ®-8 and 0-8 are backtacks. "999"• (6) Use the direction keys to move to point ©. (7) Press the (1) key. (8) Program too using the same procedure described in steps (5), (6) and (7). (9) Use the direction keys and key (I] to program stitch by stitch to © and E. (See page 5.) (10) After pressing the [I] key at the last stitch 0, press the [1] key three times to display '111" in the STEP display, and then press the [1] key. (11) The work clamp will return to the sewing start position. (12) Press the R/W switch to write the pattern to disk. (Refer to page 24.) Press the E key to enter the sewing mode. Note With this basting program, you can skip between sewing points without trimming the thread.
-
 1
1 -
2
-
3
-
4
-
5
-
6
-
7
-
 8
8 -
 9
9 -
 10
10 -
 11
11 -
 12
12 -
 13
13 -
 14
14 -
 15
15 -
 16
16 -
 17
17 -
 18
18 -
19
-
20
-
21
-
22
-
23
-
24
-
25
-
26
-
27
-
28
-
29
-
30
-
31
-
32
-
33
-
34
-
35
-
36
 |
 |
