Brother International BAS-300 Series Programmer Instruction Manual - English - Page 31
work.clamp
 |
View all Brother International BAS-300 Series manuals
Add to My Manuals
Save this manual to your list of manuals |
Page 31 highlights
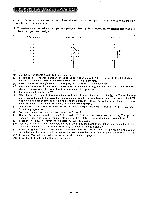
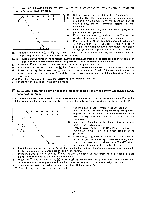
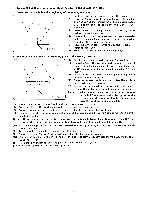
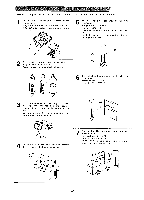
Ei To shift the shunting point from point A to point B A12 34 56 7 Y (X-0 • Y-0) (1) Set the power source switch to the ON position. (2) Press the key. The work.clamp will move to the point of origin (X-0; Y-0), the numeral "0" will be indicated on the STEP display, and the command indicator "F" will illuminate. (3) Insert the disk containing the stitch pattern program to perform the read operation. (4) Press the numeral key and the (] key. The tip of the needle will move to the shunting point A. (5) Press the 1 key, and then operate the direction keys to move the tip of the needle to the newly-established shunting point B. Then, press the key. (6) Press the numeral key E] and the H key. The tip of the needle will move to the shunting point A. (7) Press the El key, the numeral key 0 , and the key in that order. The shunting point A will be cancelled, and the tip of the needle will move to the newly-established shunting point B. (8) Press the R/W switch to write the pattern to disk. (Refer to page 24.) (9) Press the key to enter the sewing mode. E To cancel the shunting point A • 01 2 3 4 5 6 7 (1) Set the power source switch to the ON position. (2) Press theEl key. The work clamp will move to the point of origin (X-0; Y-0), the numeral "0" will be indicated on the STEP display, and the command indicator "F" will illuminate. A/ (3) Insert the disk containing the stitch pattern program, to perform the read operation. (4) Press the numeral key (I) and the (I) key. The tip of the needle will move to the shunting point A. x (5) Press the key, the numeral key 111 , and the key in that order. The shunting point A will be cancelled, and (X-0 • Y-0) the tip of the needle will move to the initial stitch position. (6) Press the R/W switch to write the pattern to disk. (Refer to page 24.) (7) Press the El key to enter the sewing mode.
-
 1
1 -
2
-
3
-
4
-
5
-
6
-
7
-
8
-
9
-
10
-
11
-
12
-
13
-
14
-
15
-
16
-
17
-
18
-
19
-
20
-
21
-
22
-
23
-
24
-
25
-
 26
26 -
 27
27 -
 28
28 -
 29
29 -
 30
30 -
 31
31 -
 32
32 -
 33
33 -
 34
34 -
 35
35 -
 36
36
 |
 |
