Brother International Innov-ís 2800D Users Manual - English - Page 100
Adjusting Patterns
 |
View all Brother International Innov-ís 2800D manuals
Add to My Manuals
Save this manual to your list of manuals |
Page 100 highlights
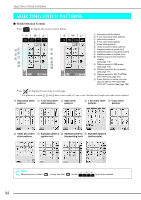
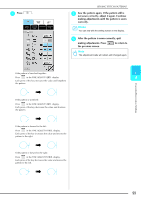
SEWING STITCH PATTERNS e Press the "Start/Stop" button to stop the machine, and then press the "Reverse/ Reinforcement Stitch" button to sew reinforcement stitches. Memo • When sewing character stitch patterns, the machine automatically sews reinforcement stitches at the end of the stitching, then stops (The machine is automatically set to sew reinforcement stitches at the beginning and end of each character.) Adjusting Patterns Depending on the type and thickness of the fabric being sewn, the sewing speed, whether or not stabilizer material is used, etc., the desired result may not be achieved. If this occurs, press , and then perform the following adjustment using the same sewing conditions as those used for your project. If the pattern is still misaligned after making adjustments with selected, adjust each pattern separately. a Press , and then press the screen. on P. 7 of • After sewing is finished, trim any excess thread. b Attach presser foot "N", and then sew the pattern. Note When sewing some patterns, the needle will stop in the raised position while the fabric is fed due to the operation of the needle bar separation mechanism which is used in this machine. At such times, a clicking sound different from the sound generated during sewing will be heard. This sound is normal and is not the sign of a malfunction. c Compare the sewn pattern with the following illustration. 98
-
 1
1 -
2
-
3
-
4
-
5
-
6
-
7
-
8
-
9
-
10
-
11
-
12
-
13
-
14
-
15
-
16
-
17
-
18
-
19
-
20
-
21
-
22
-
23
-
24
-
25
-
26
-
27
-
28
-
29
-
30
-
31
-
32
-
33
-
34
-
35
-
36
-
37
-
38
-
39
-
40
-
41
-
42
-
43
-
44
-
45
-
46
-
47
-
48
-
49
-
50
-
51
-
52
-
53
-
54
-
55
-
56
-
57
-
58
-
59
-
60
-
61
-
62
-
63
-
64
-
65
-
66
-
67
-
68
-
69
-
70
-
71
-
72
-
73
-
74
-
75
-
76
-
77
-
78
-
79
-
80
-
81
-
82
-
83
-
84
-
85
-
86
-
87
-
88
-
89
-
90
-
91
-
92
-
93
-
94
-
 95
95 -
 96
96 -
 97
97 -
 98
98 -
 99
99 -
 100
100 -
 101
101 -
 102
102 -
 103
103 -
 104
104 -
 105
105 -
106
-
107
-
108
-
109
-
110
-
111
-
112
-
113
-
114
-
115
-
116
-
117
-
118
-
119
-
120
-
121
-
122
-
123
-
124
-
125
-
126
-
127
-
128
-
129
-
130
-
131
-
132
-
133
-
134
-
135
-
136
-
137
-
138
-
139
-
140
-
141
-
142
-
143
-
144
-
145
-
146
-
147
-
148
-
149
-
150
-
151
-
152
-
153
-
154
-
155
-
156
-
157
-
158
-
159
-
160
-
161
-
162
-
163
-
164
-
165
-
166
-
167
-
168
-
169
-
170
-
171
-
172
-
173
-
174
-
175
-
176
-
177
-
178
-
179
-
180
-
181
-
182
-
183
-
184
-
185
-
186
-
187
-
188
-
189
-
190
-
191
-
192
-
193
-
194
-
195
-
196
-
197
-
198
-
199
-
200
-
201
-
202
-
203
-
204
-
205
-
206
-
207
-
208
-
209
-
210
-
211
-
212
-
213
-
214
-
215
-
216
-
217
-
218
-
219
-
220
-
221
-
222
-
223
-
224
 |
 |
