Brother International Innov-ís 2800D Users Manual - English - Page 46
Adjusting Stitch Settings
 |
View all Brother International Innov-ís 2800D manuals
Add to My Manuals
Save this manual to your list of manuals |
Page 46 highlights
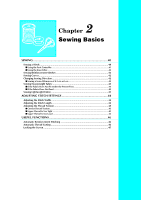
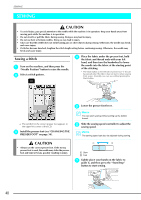
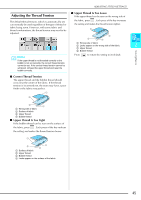
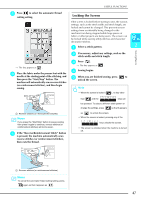
ADJUSTING STITCH SETTINGS ADJUSTING STITCH SETTINGS When a stitch is selected, the most appropriate stitch width, stitch length, and upper thread tension are automatically set. However, if needed, you can change any of the settings as described in this section. Note • Settings for some stitches cannot be changed. indicates no change is possible (see the "STITCH SETTING CHART" at the end of this manual). • If a stitch setting is changed, but not saved, the stitch setting returns to its default when the machine is turned off or a different stitch is selected. Adjusting the Stitch Width The stitch width (zigzag width) can be adjusted to make the stitch wider or narrower. Adjusting the Stitch Length The stitch length can be adjusted to make the stitch coarser or finer. Memo If the foot controller is connected, the sewing speed controller can be used to adjust the zigzag width (see page 69). Each press of makes the zigzag stitch narrower. Each press of makes the stitch finer (shorter). Each press of makes the stitch coarser (longer). Each press of makes the zigzag stitch wider. Press to return the setting to its default. Press to return the setting to its default. CAUTION • If the stitches get bunched together, lengthen the stitch length and continue sewing. Do not continue sewing without lengthening the stitch length. Otherwise, the needle may break and cause injury. 44
-
 1
1 -
2
-
3
-
4
-
5
-
6
-
7
-
8
-
9
-
10
-
11
-
12
-
13
-
14
-
15
-
16
-
17
-
18
-
19
-
20
-
21
-
22
-
23
-
24
-
25
-
26
-
27
-
28
-
29
-
30
-
31
-
32
-
33
-
34
-
35
-
36
-
37
-
38
-
39
-
40
-
 41
41 -
 42
42 -
 43
43 -
 44
44 -
 45
45 -
 46
46 -
 47
47 -
 48
48 -
 49
49 -
 50
50 -
 51
51 -
52
-
53
-
54
-
55
-
56
-
57
-
58
-
59
-
60
-
61
-
62
-
63
-
64
-
65
-
66
-
67
-
68
-
69
-
70
-
71
-
72
-
73
-
74
-
75
-
76
-
77
-
78
-
79
-
80
-
81
-
82
-
83
-
84
-
85
-
86
-
87
-
88
-
89
-
90
-
91
-
92
-
93
-
94
-
95
-
96
-
97
-
98
-
99
-
100
-
101
-
102
-
103
-
104
-
105
-
106
-
107
-
108
-
109
-
110
-
111
-
112
-
113
-
114
-
115
-
116
-
117
-
118
-
119
-
120
-
121
-
122
-
123
-
124
-
125
-
126
-
127
-
128
-
129
-
130
-
131
-
132
-
133
-
134
-
135
-
136
-
137
-
138
-
139
-
140
-
141
-
142
-
143
-
144
-
145
-
146
-
147
-
148
-
149
-
150
-
151
-
152
-
153
-
154
-
155
-
156
-
157
-
158
-
159
-
160
-
161
-
162
-
163
-
164
-
165
-
166
-
167
-
168
-
169
-
170
-
171
-
172
-
173
-
174
-
175
-
176
-
177
-
178
-
179
-
180
-
181
-
182
-
183
-
184
-
185
-
186
-
187
-
188
-
189
-
190
-
191
-
192
-
193
-
194
-
195
-
196
-
197
-
198
-
199
-
200
-
201
-
202
-
203
-
204
-
205
-
206
-
207
-
208
-
209
-
210
-
211
-
212
-
213
-
214
-
215
-
216
-
217
-
218
-
219
-
220
-
221
-
222
-
223
-
224
 |
 |