Brother International Innov-ís 2800D Users Manual - English - Page 27
Caution
 |
View all Brother International Innov-ís 2800D manuals
Add to My Manuals
Save this manual to your list of manuals |
Page 27 highlights
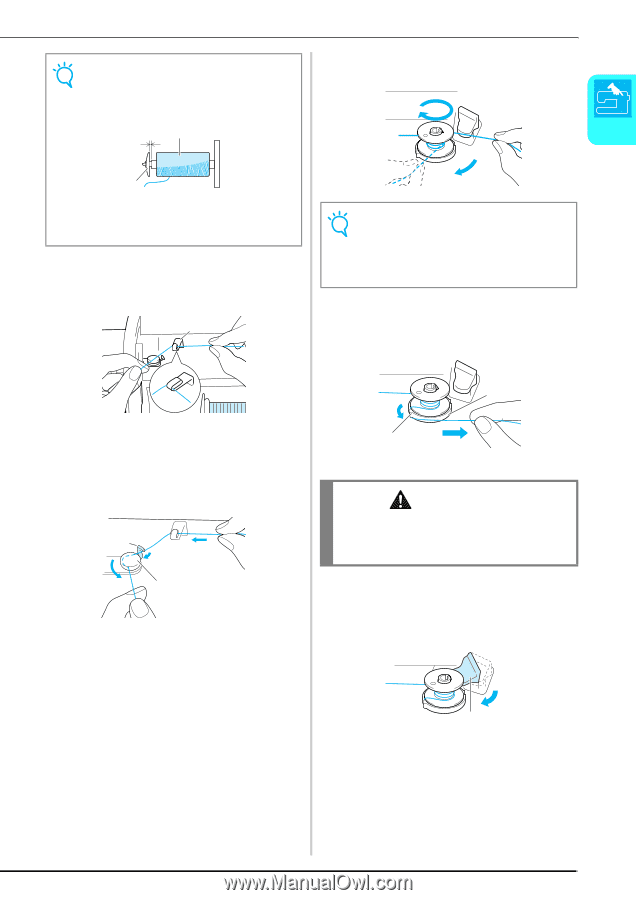
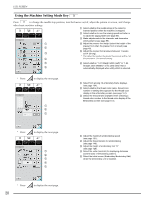
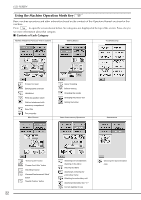
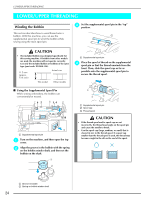
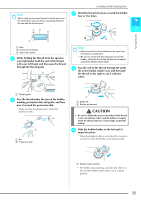
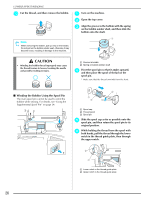
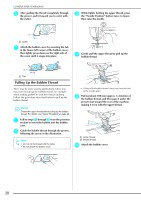
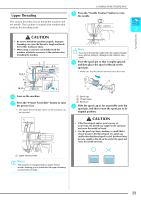
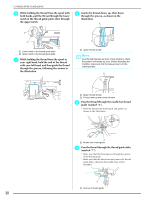
LOWER/UPPER THREADING Note When using cross-wound thread on a thin spool, use the small spool cap, and leave a small gap between the cap and the thread spool. g Wind the thread clockwise around the bobbin four or five times. 2 ab 1 Getting Ready c a Gap b Cross-wound thread c Spool cap (small) e While holding the thread from the spool in your right hand, hold the end of the thread with your left hand, and then pass the thread through the thread guide. a 3 1 Note • Make sure that the thread between the spool and the bobbin is pulled tight. • Be sure to wind the thread clockwise around the bobbin, otherwise the thread will become wrapped around the bobbin winder shaft. h Pass the end of the thread through the guide slit in the bobbin winder seat, and then pull the thread to the right to cut it with the cutter. a Thread guide f Pass the thread under the pin on the bobbin winding pretension disk and guide, and then pass it around the pretension disk. * Make sure that the thread passes under the pretension disk. a b a Pin b Pretension disk b a a Guide slit b Bobbin winder seat CAUTION • Be sure to follow the process described. If the thread is not cut with the cutter, and the bobbin is wound, when the thread runs low, it may tangle around the bobbin. i Slide the bobbin holder to the left until it snaps into place. * When the bobbin holder is set to the left, it works as a switch to make the bobbin wind automatically. a a Bobbin holder (switch) → The bobbin stops spinning automatically when it is full, and the bobbin holder returns to its original position. 25
-
 1
1 -
2
-
3
-
4
-
5
-
6
-
7
-
8
-
9
-
10
-
11
-
12
-
13
-
14
-
15
-
16
-
17
-
18
-
19
-
20
-
21
-
 22
22 -
 23
23 -
 24
24 -
 25
25 -
 26
26 -
 27
27 -
 28
28 -
 29
29 -
 30
30 -
 31
31 -
 32
32 -
33
-
34
-
35
-
36
-
37
-
38
-
39
-
40
-
41
-
42
-
43
-
44
-
45
-
46
-
47
-
48
-
49
-
50
-
51
-
52
-
53
-
54
-
55
-
56
-
57
-
58
-
59
-
60
-
61
-
62
-
63
-
64
-
65
-
66
-
67
-
68
-
69
-
70
-
71
-
72
-
73
-
74
-
75
-
76
-
77
-
78
-
79
-
80
-
81
-
82
-
83
-
84
-
85
-
86
-
87
-
88
-
89
-
90
-
91
-
92
-
93
-
94
-
95
-
96
-
97
-
98
-
99
-
100
-
101
-
102
-
103
-
104
-
105
-
106
-
107
-
108
-
109
-
110
-
111
-
112
-
113
-
114
-
115
-
116
-
117
-
118
-
119
-
120
-
121
-
122
-
123
-
124
-
125
-
126
-
127
-
128
-
129
-
130
-
131
-
132
-
133
-
134
-
135
-
136
-
137
-
138
-
139
-
140
-
141
-
142
-
143
-
144
-
145
-
146
-
147
-
148
-
149
-
150
-
151
-
152
-
153
-
154
-
155
-
156
-
157
-
158
-
159
-
160
-
161
-
162
-
163
-
164
-
165
-
166
-
167
-
168
-
169
-
170
-
171
-
172
-
173
-
174
-
175
-
176
-
177
-
178
-
179
-
180
-
181
-
182
-
183
-
184
-
185
-
186
-
187
-
188
-
189
-
190
-
191
-
192
-
193
-
194
-
195
-
196
-
197
-
198
-
199
-
200
-
201
-
202
-
203
-
204
-
205
-
206
-
207
-
208
-
209
-
210
-
211
-
212
-
213
-
214
-
215
-
216
-
217
-
218
-
219
-
220
-
221
-
222
-
223
-
224
 |
 |