Brother International Innov-ís 2800D Users Manual - English - Page 24
Using the Machine Operation Mode Key
 |
View all Brother International Innov-ís 2800D manuals
Add to My Manuals
Save this manual to your list of manuals |
Page 24 highlights
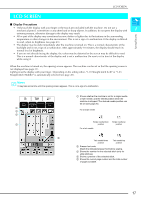
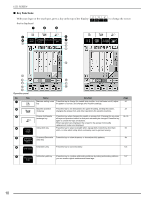
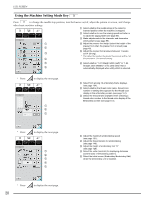
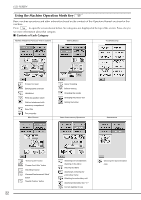
LCD SCREEN Using the Machine Operation Mode Key Basic machine operations and other information based on the contents of this Operation Manual are stored in this machine. Press to open the screen shown below. Six categories are displayed at the top of the screen. Press a key to see more information about that category. ■ Contents of Each Category Names of Machine Parts and Their Functions Sewing Basics Troubleshooting Presser foot lever Sewing speed controller Handwheel Feed dog position switch Flat bed attachment with accessory compartment Knee lifter Foot controller Main Buttons Upper threading Bobbin winding Changing the needle Changing the presser foot Setting the bobbin Basic Embroidering Operations Maintenance 22 "Thread Cutter" button "Presser Foot Lifter" button "Start/Stop" button "Reverse/Reinforcement Stitch" button "Needle Position" button Attaching iron-on stabilizers (backing) to the fabric Inserting the fabric Attaching & removing the embroidery frame Attaching the embroidery unit Attaching embroidery foot "U" Correct stabilizer to use Cleaning the race and bobbin case
-
 1
1 -
2
-
3
-
4
-
5
-
6
-
7
-
8
-
9
-
10
-
11
-
12
-
13
-
14
-
15
-
16
-
17
-
18
-
 19
19 -
 20
20 -
 21
21 -
 22
22 -
 23
23 -
 24
24 -
 25
25 -
 26
26 -
 27
27 -
 28
28 -
 29
29 -
30
-
31
-
32
-
33
-
34
-
35
-
36
-
37
-
38
-
39
-
40
-
41
-
42
-
43
-
44
-
45
-
46
-
47
-
48
-
49
-
50
-
51
-
52
-
53
-
54
-
55
-
56
-
57
-
58
-
59
-
60
-
61
-
62
-
63
-
64
-
65
-
66
-
67
-
68
-
69
-
70
-
71
-
72
-
73
-
74
-
75
-
76
-
77
-
78
-
79
-
80
-
81
-
82
-
83
-
84
-
85
-
86
-
87
-
88
-
89
-
90
-
91
-
92
-
93
-
94
-
95
-
96
-
97
-
98
-
99
-
100
-
101
-
102
-
103
-
104
-
105
-
106
-
107
-
108
-
109
-
110
-
111
-
112
-
113
-
114
-
115
-
116
-
117
-
118
-
119
-
120
-
121
-
122
-
123
-
124
-
125
-
126
-
127
-
128
-
129
-
130
-
131
-
132
-
133
-
134
-
135
-
136
-
137
-
138
-
139
-
140
-
141
-
142
-
143
-
144
-
145
-
146
-
147
-
148
-
149
-
150
-
151
-
152
-
153
-
154
-
155
-
156
-
157
-
158
-
159
-
160
-
161
-
162
-
163
-
164
-
165
-
166
-
167
-
168
-
169
-
170
-
171
-
172
-
173
-
174
-
175
-
176
-
177
-
178
-
179
-
180
-
181
-
182
-
183
-
184
-
185
-
186
-
187
-
188
-
189
-
190
-
191
-
192
-
193
-
194
-
195
-
196
-
197
-
198
-
199
-
200
-
201
-
202
-
203
-
204
-
205
-
206
-
207
-
208
-
209
-
210
-
211
-
212
-
213
-
214
-
215
-
216
-
217
-
218
-
219
-
220
-
221
-
222
-
223
-
224
 |
 |
