Brother International Innov-ís 2800D Users Manual - English - Page 74
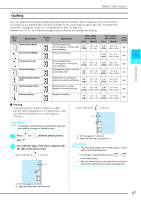
Appliqués
 |
View all Brother International Innov-ís 2800D manuals
Add to My Manuals
Save this manual to your list of manuals |
Page 74 highlights
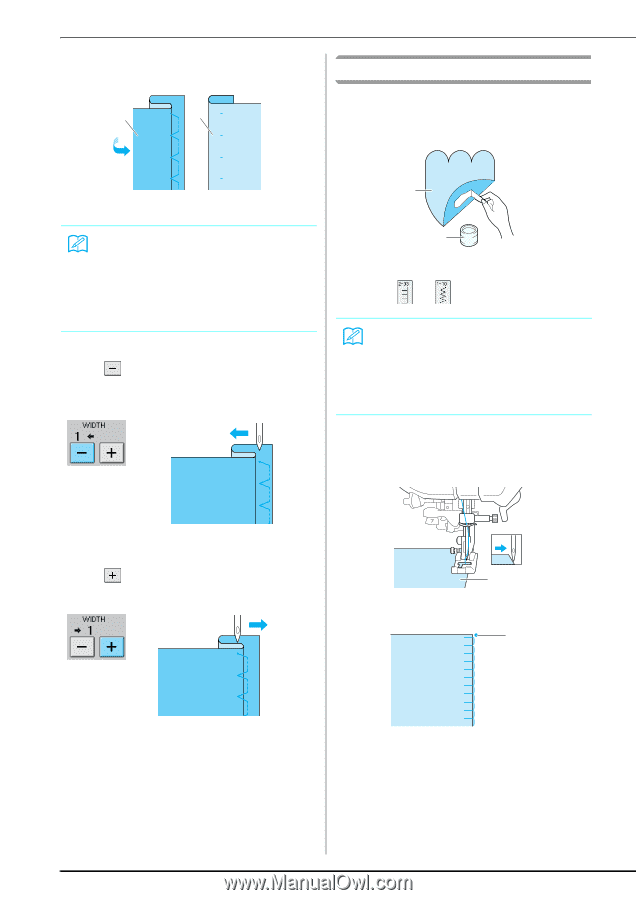
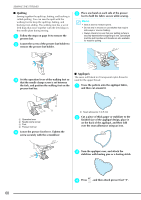
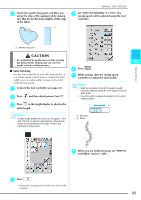
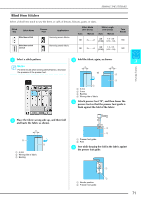
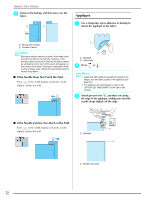
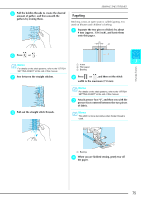
SEWING THE STITCHES f Remove the basting, and then turn over the fabric. a b Appliqués a Use a temporary spray adhesive or basting to attach the appliqué to the fabric. a Wrong side of fabric b Surface of fabric Memo Blind hem stitches cannot be sewn if the needle does not catch the fold on the left side. However, if the needle catches too much of the fold, the fabric cannot be unfolded and too much of the seam will appear on the surface of the fabric, leaving an unattractive finish. If either of these occur, follow the instructions below to correct the problem. ■ If the Needle Does Not Catch the Fold Press in the width display so that the needle slightly catches the fold. a b a Appliqué b Fabric glue b Press or . Memo • Adjust the stitch width and length according to the shape, size and fabric quality of the appliqué (see page 44). • For details on the stitch patterns, refer to the "STITCH SETTING CHART" at the end of this manual. c Attach presser foot "J", and then sew along the edge of the appliqué, making sure that the needle drops slightly off the edge. ■ If the Needle Catches Too Much of the Fold Press in the width display so that the needle slightly catches the fold. a Appliqué a a a Needle drop point 72
-
 1
1 -
2
-
3
-
4
-
5
-
6
-
7
-
8
-
9
-
10
-
11
-
12
-
13
-
14
-
15
-
16
-
17
-
18
-
19
-
20
-
21
-
22
-
23
-
24
-
25
-
26
-
27
-
28
-
29
-
30
-
31
-
32
-
33
-
34
-
35
-
36
-
37
-
38
-
39
-
40
-
41
-
42
-
43
-
44
-
45
-
46
-
47
-
48
-
49
-
50
-
51
-
52
-
53
-
54
-
55
-
56
-
57
-
58
-
59
-
60
-
61
-
62
-
63
-
64
-
65
-
66
-
67
-
68
-
 69
69 -
 70
70 -
 71
71 -
 72
72 -
 73
73 -
 74
74 -
 75
75 -
 76
76 -
 77
77 -
 78
78 -
 79
79 -
80
-
81
-
82
-
83
-
84
-
85
-
86
-
87
-
88
-
89
-
90
-
91
-
92
-
93
-
94
-
95
-
96
-
97
-
98
-
99
-
100
-
101
-
102
-
103
-
104
-
105
-
106
-
107
-
108
-
109
-
110
-
111
-
112
-
113
-
114
-
115
-
116
-
117
-
118
-
119
-
120
-
121
-
122
-
123
-
124
-
125
-
126
-
127
-
128
-
129
-
130
-
131
-
132
-
133
-
134
-
135
-
136
-
137
-
138
-
139
-
140
-
141
-
142
-
143
-
144
-
145
-
146
-
147
-
148
-
149
-
150
-
151
-
152
-
153
-
154
-
155
-
156
-
157
-
158
-
159
-
160
-
161
-
162
-
163
-
164
-
165
-
166
-
167
-
168
-
169
-
170
-
171
-
172
-
173
-
174
-
175
-
176
-
177
-
178
-
179
-
180
-
181
-
182
-
183
-
184
-
185
-
186
-
187
-
188
-
189
-
190
-
191
-
192
-
193
-
194
-
195
-
196
-
197
-
198
-
199
-
200
-
201
-
202
-
203
-
204
-
205
-
206
-
207
-
208
-
209
-
210
-
211
-
212
-
213
-
214
-
215
-
216
-
217
-
218
-
219
-
220
-
221
-
222
-
223
-
224
 |
 |