Brother International Innov-ís 2800D Users Manual - English - Page 124
Attaching, the Embroidery Unit
 |
View all Brother International Innov-ís 2800D manuals
Add to My Manuals
Save this manual to your list of manuals |
Page 124 highlights
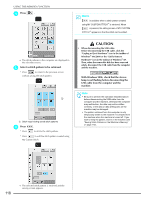
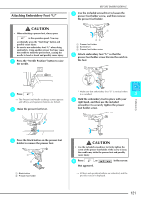
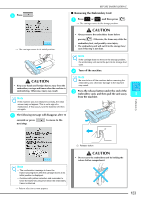
BEFORE EMBROIDERING Attaching the Embroidery Unit c Insert the embroidery unit connector into the connection port, and then lightly push in the embroidery unit until it snaps into place. CAUTION • Do not move the machine with the embroidery unit attached. The embroidery unit could fall off and cause injury. • Keep your hands and foreign objects away from the embroidery carriage and frame when the machine is embroidering. Otherwise, injury may result. • If the embroidery unit could not be initialized correctly, a buzzer will sound. If this happens, go through the initialization process again. This is not a malfunction. Note • Do not touch the embroidery unit connector, otherwise damage to the connector pins or the machine may result. • Do not apply extreme force to the embroidery unit carriage or pick up the unit by the carriage, otherwise damage to the embroidery unit may result. • Store the embroidery unit in its storage box/case. a Turn off the machine, and then remove the flat-bed attachment. a b a Connection port b Embroidery unit connector Note • Make sure that there is no gap between the embroidery unit and the sewing machine, otherwise the embroidery pattern may not be sewn correctly. Be sure to fully insert the connector into the connection port. • Do not push on the carriage when attaching the embroidery unit to the machine, otherwise damage to the embroidery unit may result. d Turn on the machine. → A message appears in the screen. Note Be sure to turn off the machine before attaching the embroidery unit, otherwise damage to the machine may result. b Slide the tab on the cover of the connection port in the direction of the arrow to open the cover. Note Be sure to close the cover of the connection port when the embroidery unit is not being used. 122
-
 1
1 -
2
-
3
-
4
-
5
-
6
-
7
-
8
-
9
-
10
-
11
-
12
-
13
-
14
-
15
-
16
-
17
-
18
-
19
-
20
-
21
-
22
-
23
-
24
-
25
-
26
-
27
-
28
-
29
-
30
-
31
-
32
-
33
-
34
-
35
-
36
-
37
-
38
-
39
-
40
-
41
-
42
-
43
-
44
-
45
-
46
-
47
-
48
-
49
-
50
-
51
-
52
-
53
-
54
-
55
-
56
-
57
-
58
-
59
-
60
-
61
-
62
-
63
-
64
-
65
-
66
-
67
-
68
-
69
-
70
-
71
-
72
-
73
-
74
-
75
-
76
-
77
-
78
-
79
-
80
-
81
-
82
-
83
-
84
-
85
-
86
-
87
-
88
-
89
-
90
-
91
-
92
-
93
-
94
-
95
-
96
-
97
-
98
-
99
-
100
-
101
-
102
-
103
-
104
-
105
-
106
-
107
-
108
-
109
-
110
-
111
-
112
-
113
-
114
-
115
-
116
-
117
-
118
-
 119
119 -
 120
120 -
 121
121 -
 122
122 -
 123
123 -
 124
124 -
 125
125 -
 126
126 -
 127
127 -
 128
128 -
 129
129 -
130
-
131
-
132
-
133
-
134
-
135
-
136
-
137
-
138
-
139
-
140
-
141
-
142
-
143
-
144
-
145
-
146
-
147
-
148
-
149
-
150
-
151
-
152
-
153
-
154
-
155
-
156
-
157
-
158
-
159
-
160
-
161
-
162
-
163
-
164
-
165
-
166
-
167
-
168
-
169
-
170
-
171
-
172
-
173
-
174
-
175
-
176
-
177
-
178
-
179
-
180
-
181
-
182
-
183
-
184
-
185
-
186
-
187
-
188
-
189
-
190
-
191
-
192
-
193
-
194
-
195
-
196
-
197
-
198
-
199
-
200
-
201
-
202
-
203
-
204
-
205
-
206
-
207
-
208
-
209
-
210
-
211
-
212
-
213
-
214
-
215
-
216
-
217
-
218
-
219
-
220
-
221
-
222
-
223
-
224
 |
 |
