Brother International Innov-ís 2800D Users Manual - English - Page 49
Locking the Screen
 |
View all Brother International Innov-ís 2800D manuals
Add to My Manuals
Save this manual to your list of manuals |
Page 49 highlights
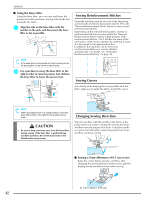
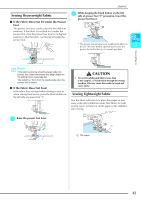
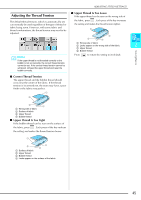
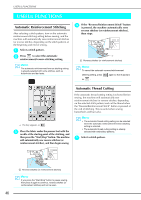
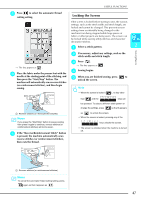
USEFUL FUNCTIONS b Press to select the automatic thread cutting setting. Locking the Screen If the screen is locked before starting to sew, the various settings, such as the stitch width and stitch length, are locked and cannot be changed. This prevents screen settings from accidentally being changed or the machine from being stopped while large pieces of fabric or other projects are being sewn. The screen can be locked while sewing utility stitches and character/ decorative stitches. a Select a stitch pattern. 2 Sewing Basics b If necessary, adjust any settings, such as the stitch width and stitch length. → The key appears as . c Place the fabric under the presser foot with the needle at the starting point of the stitching, and then press the "Start/Stop" button. The machine will automatically sew reverse stitches (or reinforcement stitches), and then begin sewing. c Press . → The key appears as . d Sewing begins. e When you are finished sewing, press unlock the screen. to Note • When the screen is locked ( ), no key other a a Reverse stitches (or reinforcement stitches) Memo If you press the "Start/Stop" button to pause sewing, then press it again to continue, reverse stitches (or reinforcement stitches) will not be sewn. d If the "Reverse/Reinforcement Stitch" button is pressed, the machine automatically sews reverse stitches (or reinforcement stitches), then cuts the thread. than and the keys can be operated. To select a different stitch pattern or change the settings, press so that it appears as to unlock the screen. • When the screen is locked, pressing any of the keys unlocks the screen. • The screen is unlocked when the machine is turned off. a a Reverse stitches (or reinforcement stitches) Memo To cancel the automatic thread cutting setting, press again so that it appears as . 47
-
 1
1 -
2
-
3
-
4
-
5
-
6
-
7
-
8
-
9
-
10
-
11
-
12
-
13
-
14
-
15
-
16
-
17
-
18
-
19
-
20
-
21
-
22
-
23
-
24
-
25
-
26
-
27
-
28
-
29
-
30
-
31
-
32
-
33
-
34
-
35
-
36
-
37
-
38
-
39
-
40
-
41
-
42
-
43
-
 44
44 -
 45
45 -
 46
46 -
 47
47 -
 48
48 -
 49
49 -
 50
50 -
 51
51 -
 52
52 -
 53
53 -
 54
54 -
55
-
56
-
57
-
58
-
59
-
60
-
61
-
62
-
63
-
64
-
65
-
66
-
67
-
68
-
69
-
70
-
71
-
72
-
73
-
74
-
75
-
76
-
77
-
78
-
79
-
80
-
81
-
82
-
83
-
84
-
85
-
86
-
87
-
88
-
89
-
90
-
91
-
92
-
93
-
94
-
95
-
96
-
97
-
98
-
99
-
100
-
101
-
102
-
103
-
104
-
105
-
106
-
107
-
108
-
109
-
110
-
111
-
112
-
113
-
114
-
115
-
116
-
117
-
118
-
119
-
120
-
121
-
122
-
123
-
124
-
125
-
126
-
127
-
128
-
129
-
130
-
131
-
132
-
133
-
134
-
135
-
136
-
137
-
138
-
139
-
140
-
141
-
142
-
143
-
144
-
145
-
146
-
147
-
148
-
149
-
150
-
151
-
152
-
153
-
154
-
155
-
156
-
157
-
158
-
159
-
160
-
161
-
162
-
163
-
164
-
165
-
166
-
167
-
168
-
169
-
170
-
171
-
172
-
173
-
174
-
175
-
176
-
177
-
178
-
179
-
180
-
181
-
182
-
183
-
184
-
185
-
186
-
187
-
188
-
189
-
190
-
191
-
192
-
193
-
194
-
195
-
196
-
197
-
198
-
199
-
200
-
201
-
202
-
203
-
204
-
205
-
206
-
207
-
208
-
209
-
210
-
211
-
212
-
213
-
214
-
215
-
216
-
217
-
218
-
219
-
220
-
221
-
222
-
223
-
224
 |
 |
