Brother International Innov-is 1000 Operation Manual - Page 11
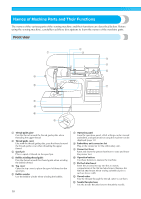
Names of Machine Parts and Their Functions
 |
View all Brother International Innov-is 1000 manuals
Add to My Manuals
Save this manual to your list of manuals |
Page 11 highlights
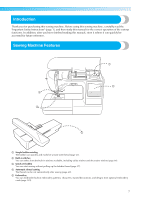
Names of Machine Parts and Their Functions The names of the various parts of the sewing machine and their functions are described below. Before using the sewing machine, carefully read these descriptions to learn the names of the machine parts. Front view a Thread guide plate Pass the thread around the thread guide plate when threading the upper thread. b Thread guide cover Like with the thread guide plate, pass the thread around the thread guide cover when threading the upper thread. c Spool pin Place a spool of thread on the spool pin. d Bobbin winding thread guide Pass the thread around this thread guide when winding the bobbin thread. e Top cover Open the top cover to place the spool of thread on the spool pin. f Bobbin winder Use the bobbin winder when winding the bobbin. 10 g Operation panel From the operation panel, stitch settings can be viewed and edited, and operations for using the machine can be displayed (page 13). h Embroidery unit connector slot Plug in the connector for the embroidery unit. i Presser foot lever Raise and lower the presser foot lever to raise and lower the presser foot j Operation buttons Use these buttons to operate the machine. k Flat bed attachment Insert the accessories tray into the accessory compartment of the flat bed attachment. Remove the flat bed attachment when sewing cylindrical pieces such as sleeve cuffs. l Thread cutter Pass the threads through the thread cutter to cut them. m Needle threader lever Use the needle threader lever to thread the needle.
-
 1
1 -
2
-
3
-
4
-
5
-
 6
6 -
 7
7 -
 8
8 -
 9
9 -
 10
10 -
 11
11 -
 12
12 -
 13
13 -
 14
14 -
 15
15 -
 16
16 -
17
-
18
-
19
-
20
-
21
-
22
-
23
-
24
-
25
-
26
-
27
-
28
-
29
-
30
-
31
-
32
-
33
-
34
-
35
-
36
-
37
-
38
-
39
-
40
-
41
-
42
-
43
-
44
-
45
-
46
-
47
-
48
-
49
-
50
-
51
-
52
-
53
-
54
-
55
-
56
-
57
-
58
-
59
-
60
-
61
-
62
-
63
-
64
-
65
-
66
-
67
-
68
-
69
-
70
-
71
-
72
-
73
-
74
-
75
-
76
-
77
-
78
-
79
-
80
-
81
-
82
-
83
-
84
-
85
-
86
-
87
-
88
-
89
-
90
-
91
-
92
-
93
-
94
-
95
-
96
-
97
-
98
-
99
-
100
-
101
-
102
-
103
-
104
-
105
-
106
-
107
-
108
-
109
-
110
-
111
-
112
-
113
-
114
-
115
-
116
-
117
-
118
-
119
-
120
-
121
-
122
-
123
-
124
-
125
-
126
-
127
-
128
-
129
-
130
-
131
-
132
-
133
-
134
-
135
-
136
-
137
-
138
-
139
-
140
-
141
-
142
-
143
-
144
-
145
-
146
-
147
-
148
-
149
-
150
-
151
-
152
-
153
-
154
-
155
-
156
-
157
-
158
-
159
-
160
-
161
-
162
-
163
-
164
-
165
-
166
-
167
-
168
-
169
-
170
-
171
-
172
-
173
-
174
-
175
-
176
-
177
-
178
-
179
-
180
-
181
-
182
 |
 |
