Brother International Innov-is NS80e Operation Manual - Page 14
Winding/Installing the Bobbin
 |
View all Brother International Innov-is NS80e manuals
Add to My Manuals
Save this manual to your list of manuals |
Page 14 highlights
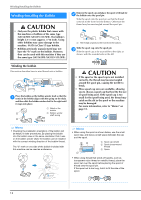
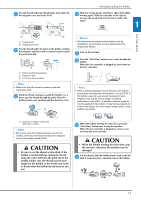
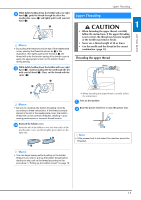
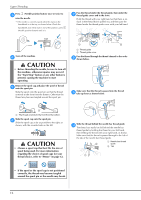
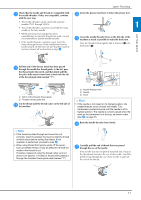
Winding/Installing the Bobbin Winding/Installing the Bobbin CAUTION • Only use the plastic bobbin that comes with this machine or bobbins of the same type (SA156/SFB: XA5539-151/SFB). The bobbin's height is 11.5 mm (approx. 7/16 inch). Using other bobbins may cause damage to the machine. SA156 is Class 15 type bobbin. • Bobbins previously manufactured may not have the "b" mark on the bobbin. However, they can be used with this machine if they are the same type (SA156/SFB: XA5539-151/SFB). Remove the spool cap and place the spool of thread for b the bobbin onto the spool pin. Slide the spool onto the spool pin so that the thread unwinds to the front from the bottom. Otherwise the thread may become tangled around the spool pin. 1 1 The thread unwinds to the front from the bottom. Slide the spool cap onto the spool pin. c Slide the spool cap as far as possible to the right, as shown, with the rounded side on the left. Winding the bobbin This section describes how to wind thread onto a bobbin. Place the bobbin on the bobbin winder shaft so that the a notch in the bobbin aligns with the spring on the shaft, and then slide the bobbin winder shaft to the right until it snaps into place. 1 Notch in the bobbin 1 2 Bobbin winder shaft spring 2 CAUTION • If the spool or the spool cap is not installed correctly, the thread may become tangled around the spool pin, causing the needle to break. • Three spool cap sizes are available, allowing you to choose a spool cap that best fits the size of spool being used. If the spool cap is too small for the spool being used, the thread may catch on the slit in the spool or the machine may be damaged. For more information, refer to "Memo" on page 12. Memo • Checking the installation orientation of the bobbin will be helpful in later procedures. By placing the bobbin into the bobbin case in the same orientation that it was on the bobbin winder shaft, the bobbin can be installed with the correct winding direction of the bobbin thread. The "b" mark on one side of the bobbin included with this machine can be used as a reference. Memo • When using the spool as shown below, use the small spool cap, and leave a small space between the cap and the spool. 32 1 1 Spool cap (small) 2 Spool (cross-wound thread) 3 Space • When using thread that winds off quickly, such as transparent nylon thread or metallic thread, place the spool net over the spool before placing the spool of thread onto the spool pin. If the spool net is too long, fold it to fit the size of the spool. 12
-
 1
1 -
2
-
3
-
4
-
5
-
6
-
7
-
8
-
 9
9 -
 10
10 -
 11
11 -
 12
12 -
 13
13 -
 14
14 -
 15
15 -
 16
16 -
 17
17 -
 18
18 -
 19
19 -
20
-
21
-
22
-
23
-
24
-
25
-
26
-
27
-
28
-
29
-
30
-
31
-
32
-
33
-
34
-
35
-
36
-
37
-
38
-
39
-
40
-
41
-
42
-
43
-
44
-
45
-
46
-
47
-
48
-
49
-
50
-
51
-
52
-
53
-
54
-
55
-
56
-
57
-
58
-
59
-
60
-
61
-
62
-
63
-
64
-
65
-
66
-
67
-
68
-
69
-
70
-
71
-
72
 |
 |
