Brother International Innov-is NS80e Operation Manual - Page 8
Operation buttons, Operation panel and operation keys
 |
View all Brother International Innov-is NS80e manuals
Add to My Manuals
Save this manual to your list of manuals |
Page 8 highlights
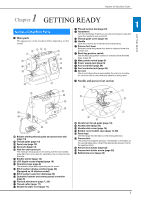
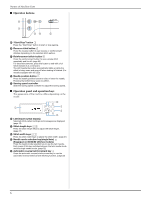
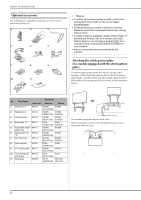
Names of Machine Parts ■ Operation buttons b a cd e 1 "Start/Stop" button Press the "Start/Stop" button to start or stop sewing. 2 Reverse stitch button Press the reverse button to sew reverse or reinforcement stitches depending on the selected stitch pattern. 3 Reinforcement stitch button Press the reinforcement button to sew a single stitch repeatedly and tie-off. (page 25) For decorative stitches, press this button to end with a full stitch instead of at a mid-point. The LED beside the button automatically lights up while the stitch is being sewn and goes off when sewing is finished. (For models equipped with the LED) 4 Needle position button Press the needle position button to raise or lower the needle. Pressing the button twice sews one stitch. 5 Sewing speed controller Slide the sewing speed controller to adjust the sewing speed. ■ Operation panel and operation keys The appearance of the machine differs depending on the model. b a d e c 1 LCD (liquid crystal display) Selected stitch pattern settings and messages are displayed. (page 10) 2 Stitch length keys Press the stitch length keys to adjust the stitch length. (page 27) 3 Stitch width keys Press the stitch width keys to adjust the stitch width. (page 27) 4 Needle mode selection key (single/twin) (Equipped on 80/60/50 stitches models) Press the needle mode selection key to use the twin needle. Each press of this key switches between the twin needle mode and the single needle mode. (page 52) 5 Automatic reverse/reinforcement key Press the automatic reverse/reinforcement key to use the automatic reverse/reinforcement stitching function. (page 25) 6
-
 1
1 -
2
-
 3
3 -
 4
4 -
 5
5 -
 6
6 -
 7
7 -
 8
8 -
 9
9 -
 10
10 -
 11
11 -
 12
12 -
 13
13 -
14
-
15
-
16
-
17
-
18
-
19
-
20
-
21
-
22
-
23
-
24
-
25
-
26
-
27
-
28
-
29
-
30
-
31
-
32
-
33
-
34
-
35
-
36
-
37
-
38
-
39
-
40
-
41
-
42
-
43
-
44
-
45
-
46
-
47
-
48
-
49
-
50
-
51
-
52
-
53
-
54
-
55
-
56
-
57
-
58
-
59
-
60
-
61
-
62
-
63
-
64
-
65
-
66
-
67
-
68
-
69
-
70
-
71
-
72
 |
 |
