Brother International MFC-J625DW Advanced Users Manual - English - Page 54
DPOF printing, PhotoCapture Center™ print settings, Print Quality
 |
View all Brother International MFC-J625DW manuals
Add to My Manuals
Save this manual to your list of manuals |
Page 54 highlights
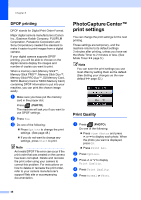
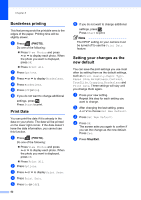
Chapter 8 DPOF printing 8 DPOF stands for Digital Print Order Format. Major digital camera manufacturers (Canon Inc., Eastman Kodak Company, FUJIFILM Corporation, Panasonic Corporation and Sony Corporation) created this standard to make it easier to print images from a digital camera. If your digital camera supports DPOF printing, you will be able to choose on the digital camera display the images and number of copies you want to print. When a memory card (Memory Stick™, Memory Stick PRO™, Memory Stick Duo™, Memory Stick PRO Duo™, SD Memory Card, SDHC Memory Card or SDXC Memory Card) containing DPOF information is put into your machine, you can print the chosen image easily. a Make sure you have put the memory card in the proper slot. Press (PHOTO). The machine will ask you if you want to use DPOF settings. b Press Yes. c Do one of the following: Press Options to change the print settings. (See page 48.) If you do not want to change any settings, press Start to print. Note An Invalid DPOF File error can occur if the print order that was created on the camera has been corrupted. Delete and recreate the print order using your camera to correct this problem. For instructions on how to delete or recreate the print order, refer to your camera manufacturer's support Web site or accompanying documentation. PhotoCapture Center™ print settings 8 You can change the print settings for the next printing. These settings are temporary, and the machine returns to its default settings 3 minutes after printing, unless you have set the Mode Timer to 2 minutes or less. (See Mode Timer uu page 5.) Note You can save the print settings you use most often by setting them as the default. (See Setting your changes as the new default uu page 52.) Print Quality 8 a Press (PHOTO). Do one of the following: Press View Photos and press s or t to display each photo. When the photo you want is displayed, press OK. Press Print All. b Press Options. c Press s or t to display Print Quality. d Press Print Quality. e Press Normal or Photo. 48
-
 1
1 -
2
-
3
-
4
-
5
-
6
-
7
-
8
-
9
-
10
-
11
-
12
-
13
-
14
-
15
-
16
-
17
-
18
-
19
-
20
-
21
-
22
-
23
-
24
-
25
-
26
-
27
-
28
-
29
-
30
-
31
-
32
-
33
-
34
-
35
-
36
-
37
-
38
-
39
-
40
-
41
-
42
-
43
-
44
-
45
-
46
-
47
-
48
-
 49
49 -
 50
50 -
 51
51 -
 52
52 -
 53
53 -
 54
54 -
 55
55 -
 56
56 -
 57
57 -
 58
58 -
 59
59 -
60
-
61
-
62
-
63
-
64
-
65
-
66
-
67
-
68
-
69
-
70
-
71
-
72
-
73
-
74
-
75
-
76
-
77
-
78
-
79
 |
 |