Brother International MFC-J870DW Quick Setup Guide - Page 2
Connect the power cord, and telephone line
 |
View all Brother International MFC-J870DW manuals
Add to My Manuals
Save this manual to your list of manuals |
Page 2 highlights
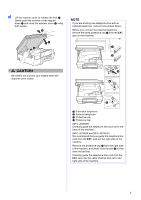
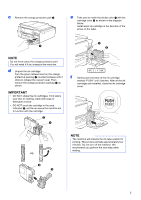
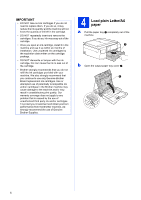
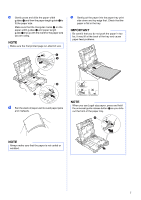
a Remove the protective tape and film covering the machine, and also from the Touchscreen. b Remove the plastic bag a containing the ink cartridges from on top of the paper tray. b Lift the scanner cover until it locks securely into the open position. 1 c Make sure you have all the components. 2 Connect the power cord and telephone line IMPORTANT DO NOT connect the USB cable yet (if you are using a USB cable). a Connect the power cord. c Connect the telephone line cord. Connect one end of the telephone line cord to the jack marked LINE on the machine. Carefully guide the telephone line cord into the cable channel and out the back of the machine. Connect the other end to a modular wall jack. NOTE • If you do not plan to use the fax feature on this machine, go to step 3 on page 4. • To prolong the life of the print head, provide the best ink cartridge economy and maintain print quality, we do not recommend unplugging the machine frequently and/or leaving the machine unplugged for extended periods of time. Each time you plug the machine in, it automatically cleans the print heads, which uses some of your ink. We recommend using to power down the machine. Using allows minimal power to the machine, resulting in periodic, but less frequent, cleaning of the print heads. IMPORTANT The telephone line cord MUST be connected to the jack marked LINE on the machine. 2
-
 1
1 -
 2
2 -
 3
3 -
 4
4 -
 5
5 -
 6
6 -
 7
7 -
 8
8 -
9
-
10
-
11
-
12
-
13
-
14
-
15
-
16
-
17
-
18
-
19
-
20
-
21
-
22
-
23
-
24
-
25
-
26
-
27
-
28
-
29
-
30
-
31
-
32
-
33
-
34
-
35
-
36
-
37
-
38
-
39
-
40
-
41
-
42
-
43
-
44
-
45
-
46
 |
 |
