Campbell Scientific IRGASON IRGASON Integrated CO2/H2O Open-Path Gas Analyzer - Page 21
Wiring and Connections, IRGASON, Integrated CO, O Open-Path Gas Analyzer and 3D Sonic Anemometer
 |
View all Campbell Scientific IRGASON manuals
Add to My Manuals
Save this manual to your list of manuals |
Page 21 highlights
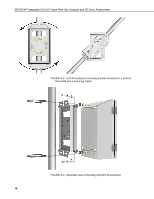
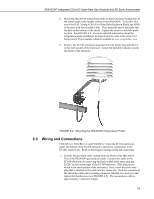
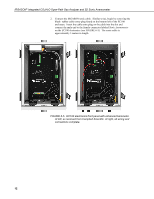
IRGASON® Integrated CO2/H2O Open-Path Gas Analyzer and 3D Sonic Anemometer 8. Mount the IRGASON temperature probe so that it measures temperature at the same height as the sample volume of the IRGASON. To do this, first attach the R.M. Young 41303-5A 6-Plate Solar Radiation Shield (pn 4020) to the mast with the included u-bolt. Next, insert the end of the probe into the hole on the bottom of the shield. Tighten the screws to hold the probe in place. See FIGURE 6-4. For more detailed information about the temperature probe installation and specifications, refer to the Model 107 Temperature Probe manual, which is available at www.campbellsci.com. 9. Remove the EC100- enclosure desiccant from the plastic bag and place it in the mesh pocket of the enclosure. Attach the humidity indicator card to the inside of the enclosure. FIGURE 6-4. Mounting the IRGASON Temperature Probe 6.3 Wiring and Connections FIGURE 6-5, FIGURE 6-6, and FIGURE 6-7 show the EC100 electronics panel, the bottom of the EC100 enclosure, and sensor connections to the EC100, respectively. Refer to these figures during wiring and connecting. 1. Find the thicker black cable coming from the block of the IRGASON. This is the IRGASON gas-analyzer cable. Connect this cable to the EC100 electronics by removing the black-rubber cable entry plug (pn 26224) on the bottom right of the EC100 enclosure. (This plug can be stored in the mesh pocket of the enclosure). Next, insert the cable entry plug that is attached to the cable into the vacant slot. Push the connector at the end of the cable onto its mating connector (labeled Gas Analyzer) and tighten the thumbscrews (see FIGURE 6-5). The gas analyzer cable is approximately 3 meters in length. 11
-
 1
1 -
2
-
3
-
4
-
5
-
6
-
7
-
8
-
9
-
10
-
11
-
12
-
13
-
14
-
15
-
 16
16 -
 17
17 -
 18
18 -
 19
19 -
 20
20 -
 21
21 -
 22
22 -
 23
23 -
 24
24 -
 25
25 -
 26
26 -
27
-
28
-
29
-
30
-
31
-
32
-
33
-
34
-
35
-
36
-
37
-
38
-
39
-
40
-
41
-
42
-
43
-
44
-
45
-
46
-
47
-
48
-
49
-
50
-
51
-
52
-
53
-
54
-
55
-
56
-
57
-
58
-
59
-
60
-
61
-
62
-
63
-
64
-
65
-
66
 |
 |
