Canon CONSOLE Image Control & Storage Software v1.1 Console Software Operation - Page 16
Video Folder and Recording Settings
 |
View all Canon CONSOLE Image Control & Storage Software v1.1 manuals
Add to My Manuals
Save this manual to your list of manuals |
Page 16 highlights
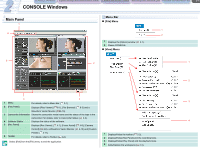
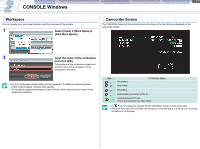
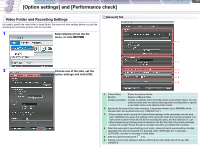
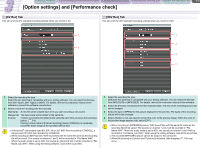
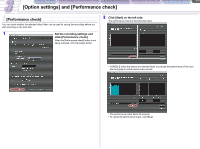
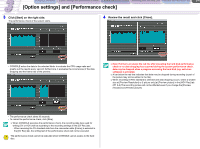
CONSOLE Windows [Option settings] and [Performance check] Camera and Picture Control Recording onto the Hard Disk Playback the Recorded Files 3-1 [Option settings] and [Performance check] Video Folder and Recording Settings You need to specify the video folder (a target folder), file name and other settings before you start the recording the camcorder pictures onto the hard disk. [General] Tab 1 Select [Option] from the file menu, or click . 1 2 2 Choose one of the tabs, set the 3 option settings and click [OK]. 4 5 6 1 [Video folder] Shows the selected folder. [Modify] Selects a different folder. [Create sub-folder] Creates a subfolder within the folder shown under [Video folder]. You can name the folder after the date by selecting [Use recording date] or specify a new folder name under [Specify folder name]. 2 Specify the file name of the video recording. A sequence number (up to 9999999) will be allocated after the specified prefix (e.g."CNSL0001.avi"). 3 • Place a check mark to record the Custom Preset settings of the camcorder onto the hard disk. CONSOLE only saves the settings of the camcorder when the recoding is started. The name of the Custom Preset file will be the recording file name, and the extension is ".cpf". • When [Sequence] or [Frame] mode is selected in the [DV Rec] tab of the [Option settings] window, the Custom Preset file will be recorded only when you started the recording. 4 When the camcorder's sound setting is set to 4ch, channel 3 and 4 sounds will be recorded separately from the recording file. For example, when "DVPC0001.avi" is recorded, "DVPC0001_sub.wav" is recorded in video folder. 5 Sets the cache recording time ( 5-3). 6 Placing a check mark displays a dialog confirming the video folder each time you start CONSOLE.
-
 1
1 -
2
-
3
-
4
-
5
-
6
-
7
-
8
-
9
-
10
-
 11
11 -
 12
12 -
 13
13 -
 14
14 -
 15
15 -
 16
16 -
 17
17 -
 18
18 -
 19
19 -
 20
20 -
 21
21 -
22
-
23
-
24
-
25
-
26
-
27
-
28
-
29
-
30
-
31
-
32
-
33
-
34
-
35
-
36
-
37
-
38
-
39
-
40
-
41
-
42
-
43
-
44
-
45
-
46
-
47
-
48
-
49
-
50
-
51
-
52
-
53
 |
 |
